May 26, 2021

Upgrading My V! Kenwood GE-7030 Equaliser

With a pair of  Bose 901 MK VI speakers serving as the front main channels of  my 5.2.4 Dolby Atmos surround sound system, I have discovered that adding an EQ(in the form of a Pioneer GR-555) in to the mix only for the front channels improved the over sound performance of the system. What I did not realized is that  the quality of the EQ component mattered in HT too, just like in our 2 channel stereo system. Here goes......

The Kenwood GE-7030 comes with a frequency jog dial & level up/down buttons for easy band selection and adjustment. Excellent ergonomics when in use, even if all those buttons on the front face plate seemed a little daunting at first!

Spotted this unit on FB Market Place, made the inquiry, but due to it's high asking price I actually held back & thought carefully about it for more than a month if the more expensive EQ really makes a difference? I guess some times, what's meant to be was meant to be, as what are the chances that an item is still there after a whole long month or more? Based on my trading experience on FB Market Place, the stuff is usually gone after a few days if one is eyeing & not making an effort to secure the item.

Anyway, met the seller who was a really friendly guy and he gave me about an hour of his time, just walking me thru all the bells & whistles that this Kenwood GE-7030 has got. Basically, one can work this Kenwood EQ in 3 ways. First is the most common used as 14 band Graphic EQ. Next is as a 3/14 band grouped Parametric EQ. Last is the easiest, using it's 7 pre-programed stored EQ Genre curves, which includes modes such as Flat, Pop, Rock, Car, Jazz 1, Classical 1 or Classical 2. Last but not least, that matching pale bluish dot matrix text & bar display just matches my stack of other components from Denon, Cambridge Audio & Oppo. The Kenwood does not stick out like a sore thumb, unlike my earlier Pioneer GR-333 EQ which came with bright amber bar display. And believe it or not, the Kenwood GE-7030 was sold during the 1991-1992 catalog years. The fact that it's still around today is testament to Kenwood, and probably most Japanese audio manufacturers during the era, that overall high standard of build quality. The Kenwood also came in a tall, massive & deep 2U chassis, which on itself looks just like a second AVR on the rack, but weighting only 5.4kgs. Not too heavy, but for an EQ, it's a battle cruiser. 

My HT component stack. from top, Denon X-4400H AVR, Oppo UDP-203 & BDP-83 Blu-ray player, Cambridge Audio A-120 4 channel power amp, Kenwood GE-7030 EQ, and lastly Weiduka PLC and other auxiliary components, like HD Toaster & that Arcana HD Fury(hidden behind)

The Kenwood GE-7030 unit that I bought came with some minor scratches and dings on the front faceplate, which required some touching up with permanent black marker. Once marker ink dried, with a bit of elbow greasing, the touch up will look almost seem less, unless viewed up close  

With the Kenwood EQ plugged in to my AV system, allowing me to only manipulate the front channel tonal response, I played around with a variety of settings which included Parametric, Pre-Programed, but eventually  settled on that characteristic 14 band V setting on Graphic EQ mode which worked so well on Bose 901 speakers with the Pioneer EQ in use previously. With the EQ setting been custom set in memory, I can move on to enjoy my music & movies. Yes, I actually use the HT system on Denon HEOS to stream Spotify or just MP3 file loaded from my smart phone.

The first thing that hit me was how much more transparent sounding this Kenwood EQ is compared to the Pioneer EQ. It's not a fair competition either as the Kenwood is at least 2 steps up the model line, which equals to a Pioneer GR-777 in that case. However, the Kenwood EQ operates on all logic & memory control board while the Pioneer is still based on the classic electronic sliders. I am not sure if that's the advantage here, but the difference is easily heard, it's just so much more can be heard with the Kenwood, like a veil has been lifted off the sound track and music. The Kenwood is also more powerful sounding, the music & sound tracks just comes alive, as in gun shots, cannons and explosions hit harder, kick drums "kick" harder, and vocals, crystal clear and even with nice imaging thrown in when playing music in stereo mode! While vocals is crystal clear, it still maintains a degree of body within the image of the sound stage! Bass & treble definition is also improved  with the new clarity. Highs are more airy and bass lines can be followed easily. I can't say enough how well this Kenwood EQ matched the Bose 901 MK VI speakers. 

Just a caveat if you're reading this, it may not be a good idea to add an EQ in to the mix if you're not using Bose 901 series speakers in your stereo or HT system. The unique design and sound character of the Bose 901 series speakers demands that an EQ be used with it. There maybe other speaker designs with an EQ requirement, but I believe those are far & few in between, with the Bose 901 series being the poster boy of the group!  

May 23, 2021

Heart of your home cinema

Cinema is the one place that no matter what age or gender that will likely to go for some family entertainment or even with friends. Thanks to the pandemic that enjoyment is pretty much non existing for now at least. Home cinema or theater has been the next best thing to have. This days with so much high resolution content from blu ray discs to online streaming. Is totally no brainer to seat at home to enjoy the endless titles of movies. 

Traditionally, it has been the TV that dominant the home theater or I will say TV is a common hardware you can find in almost every home in nearly any countries around the world. The best thing is the prices of TV this days is very much encouraging and the size of TV is easily goes up to 85" with affordable price. Although that is the case but a relatively large screen size of 100" or more still is unreachable for most for the TV. The best alternative option is the projector. The same can be said for projector as well with much affordable price and easily bought this days.


For people who are venturing into projector or about to take the plunge, there are few things to consider to get the best of projector or the very least avoiding any blunder. Of course the first thing will be the projector itself. What kind of projector, just like TV with many different models and specs. Probably when choosing a display (TV or Projector) will think about the picture quality in term on resolution. Is either fullHD or 4k display. Is pretty straight probably for most to go with 4k however this will be also more costly. Next thing which is very important is the light source. Traditionally projector uses lamp as light source. Just like TV using backlighting as light source. Recent years, laser is being introduce as light source to the projector world. Now the thing with different light source of course will give you different kind of picture quality and so on but the thing most people will consider is the cost. Laser projector is more costly than the lamp projector. Of course the good thing about laser is the long life span compare to a lamp that might burn out in about 3000-4000 hours. Different brands of projector the cost vary as well. 


                                                                            3 LCD


                                                                               DLP

The next part of the light source is how it is use to project the image into the screen. There are 2 types which is the 3LCD and DLP. As from the image you can see that 3 LCD uses 3 pieces of mirros for 3 prime colours of red, green, blue to project the image. Whereas DLP uses a colour wheel for the 3 prime colours. DLP being the more simple setup also means the cost is lower than 3 LCD in general of course in term of picture quality, 3 LCD will be preferred as the colour is more accurate.


Of course once you know which projector to go, you will also want to know screen. There are many screen types but the main consideration to start will be the size. How big you want your screen to be. This need to depend on your projector throw as well. What is means is that, how far away the projector from the screen to have the size that you want. Every projector is different. This is best refer to the projector brand with proper calculator to get this right. Also you can consider acoustic transparent screen. Meaning the screen has micro or tiny holes for sound to pass through. With this kind of screen you can place speakers behind the screen and not blocking the sound. Finally we can choose for fixed screen or roll up screen. 

Projector and screen is done and next will be placing the projector. Some prefer to mount the projector, some will place it on some rack or furniture. Now if you do mount the projector, it is important to know the mount so you will know if that fit your projector. Not all projector will fit into standard projector mount. Also the weight need to be consider. The placement of the mount is important to make sure you can have the projection image throw into your screen. Some projector do have function to move the display or screen shift. If your projector doesn't do that, than is even more important to place the mounting accurately for the display to be in proper size and location.


Last but not least is the HDMI cable. Assuming with projector, usually you will need long run cable from player to the projector. Usually cable length is really not much of a concern, after all it is digital cable. Now the thing with long run cable is the speed of the cable will reduce on long distance. Again this is not much of a concern most of the time. Now the issue we need to consider is the 4k HDR or HDR+. To enable 4k 60hz image with full colour chroma of 4:4:4, the cable need to be able to sustain 18 Gbps speed. What happen if it fail ? The possibility of not getting any image. The audio part is fine as HDMI can carry any kind of surround format without issue. Normal copper cable is not enough to run high speed. Its like home high speed internet is usually fiber cables are use. This apply as well for HDMI. To achieve high speed requirement for the display, fiber HDMI is the answer to it.

Finally once you have your hardware setup is time to enjoy your movie with some nice popcorn. 


May 13, 2021

Bass Matters! Bass Management/Calibration

Its has been ages since anyone posted on bass management. Last week I have talk about doing auto calibration or calibration for your multi channel audio. This is something tedious and time consuming. I think to some can be mind boggling. It is how I started as well but I am lucky to be guided by some of the best sifu there is. Another lucky thing is many forum members willingness to share on their experience especially the mistake learn which helps a ton to me.


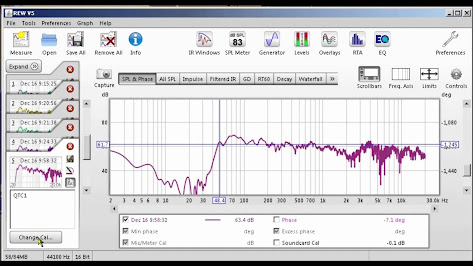
First thing I learn about management is the essential tool. The more common tool most members are using is the REW software with the Umik-1 mic. There are tons of better products out there but that is another topic. REW is a measurement tool of how the sound respond. The purpose of it, is to know what might be dip and peak of different frequency. Knowing that will tell us what we want to focus in getting it to the more ideal level. Looking at the graph I have posted is the respond of my dual subs to my room. You can see that is all the bumps and dip still even after much work was done in correcting it.  


REW or (Room EQ Wizard) is the software use for measuring audio. It can be downloaded from https://www.roomeqwizard.com/ as it is a freeware. This can be use as SPL meter to measure how loud the sound which is very useful when doing leveling on multichannel audio. Of course to use the software you need the hardware for the measurement. That is the umik-1 from the company (MiniDSP). Its a Hong Kong based company that produces hardware of various kind of audio management. Its sold for USD79 which can be bought here https://www.minidsp.com/products/acoustic-measurement/umik-1


With this hardware and software is pretty much you can start doing the calibration work on your audio. This also applies for stereo or any number of channels. The limitation right now is the REW software ability to measure height speakers. Of course you can always rely on the software in your processor to do that as well. Some pictures here just to show some example of measurement I have done for my home theater setup. You can see the graph with multiple measurements for different channels. The other graph with just 1 line is the subwoofer measurement.


One additional tool which I have in place is the minidsp 2x4 HD. What it means 2x4 as it have 2 inputs and 4 outputs. This is use for subwoofers to manage the bass which will help on top of the processor calibration. The minidsp has more functions which can do tons in calibrating the LFE (Low Frequency Effect) or bass in your home theater setup. The beauty of this hardware, it works with the REW software. Practically the measurement done in REW can be imported into the minidsp to save some work on your calibration.


This is the result I have gotten so far for my dual SVS subs which consists of SB16 and PB16. Its a mix of sealed and ported subs in my setup which I think is best of both worlds. This is not quite popular I will say as integrating both subs can be a big challenge. Get it right and is very satisfying. Time to get back to more movies. Cheers......


May 11, 2021

TAD TSM-2201 Loudspeakers - Part 2

This is the continuation from my last post on the TAD TSM-2201 loudspeakers, which can found here ->  http://hifi-unlimited.blogspot.com/2021/04/tad-tsm-2201-loudspeakers-part-i.html.


So, after I put up the TSM-2201 loudspeakers in my listening room, I proceeded to experiment with their positioning. My options were limited though, as my main speakers, the TAD-CR1s were still in their original positions.. The final position that I arrived at for the TSM-2201 was slightly in front of the TAD-CR1 loudspeakers, which freed and opened up their sound somewhat, and with a slight toe-in, which sharpened the image focus a bit. 

After a couple of weeks of running and listening to the TSM-2201s, I believe I can encapsulate and summarize their performance in one word: "Honest". They basically don’t have much character of their own, their raison d’etre is to faithfully reproduce the signal fed to them, and I meant not only from the recordings, but also from the equipment that is feeding them. 


Let me elaborate more. My impression of the TSM-2201 is that they are of very low distortion and very low colouration. They don't favour any particular part of the frequency spectrum. meaning that they don’t have any hump/boost built into their frequency response to give an impression of big bass, or to have an emphasis on the vocal range, or to produce a dark or a sweet or a brilliant treble region. They pretty much have a linear frequency response. 

The TSM-2201's sound reproduction is coherent and its detail retrieval is simply excellent at this price range. They handle dynamics with aplomb, which can’t be said of all mini monitors.  

Solo piano recordings can be a big challenge to many system. As the piano covers almost the entire frequency range for music, any significant unevenness in a replay system will make the notes sound as if they are not coming from the same instrument. In addition, piano is a percussive instrument, therefore the loudspeakers' transient and dynamic capabilities are important. The sound from a piano is also harmonically rich and complex so the loudspeaker's ability to portray details, as captured in the recording, is critical for the complete listening experience.

Listen to this recording of solo piano (made with a handheld iPhone SE) below, from George Winston's "Autumn" album, track 3 "Longing/Love". I found the TSM-2201's handing of it exemplary. The nuances in George Winston's playing was clearly delivered, the piano's tonal colour pretty much matched what I am used to hearing on a real life piano, I could imagine a piano playing in front of me. The only nit picking I had was on the piano left hand, the bass notes were clean but I'd wish for more weight, this is of course limited by the TSM-2201's size. 


The TSM-2201's imaging is sharp and clear, but not etchy, and the image size and soundstage were realistically portrayed. They can go loud and I believe they could fill up smaller room with no issue. My mid-sized listening room (15ft x 22ft x 9ft wdh) could be filled up adequately with simpler music (vocals, jazz, smaller ensemble). I could make them struggle with big orchestral work, but not with this track from Reference Recordings' "Tutti" SACD, track 1 "Dance of the Tumblers". The dynamics, attack and soundstage spread were all there, it was a satisfying listening experience for me. Take a listen to this recording made on my iPhone SE:


As the TSM-2201 is revealing, the upstream equipment matched to it and also the acoustic environment it plays in become important. This may entail a bit more work on the owner's part, but you will be rewarded once you get this right. I have heard the TSM-2201 tipping into aggressive territory when partnered with equipment renowned for its relentless drive. Bright or rough sounding partners would also render the TSM-2201 sounding overly bright. My smaller amplifiers, the Pass Labs Aleph 3 and Musical Fidelity A1, both class A amps, worked very well, even the humble NAD316BEE integrated amplifier was a great match too.  

At the end of the day, whether an audiophile loves the TSM-2201 would depend on his/her philosophy towards his/her sound system. Are you the kind who has a sonic “target” in your mind and wants audio equipment that can sculpt or beautify your system’s sound reproduction to your liking? Or, is your aim to hear what has been put down in the recordings, and you believe that audio equipment should, as much as possible, not impose their signature on the musical message, but instead, should just be faithful and aim to reproduce the unvarnished truth, as per what’s on the recordings?

My experience with TAD is that its audio equipment veer heavily to the latter. The TSM-2201 is no exception. Since my personal liking is also of the latter, if anyone were to ask me whether the TSM-2201 sounds good, my answer would be, "I found the TSM-2201 to sound very very good!" 

Time and again, I found myself getting bored quickly with audio equipment that imposes too heavy a sonic fingerprint on its reproduction, though the sound can be very good on first listen, different recordings would start to have the same sound over the long haul. And when an audiophile gets bored, he/she starts to look for something else and thus the cycle of equipment change goes on.

On the other hand, when I come across equipment that are more faithful to the source, such as TAD, I started to realize that there was so much enjoyment to be had from listening to the music, the artists’ performance, and the recordings themselves, rather than listening to the equipment. I was surprised time and again by the varieties of sound from different recording labels, different artists, different bands / orchestras which enhanced my music experience and my listening enjoyment tremendously. 

At the end, will you find the TSM-2201 tempting? You decide. Let me leave you with this local recording of 2V1G, from their 3rd album "Tempting Heart", track 8 "Feminine as Flower 女人花".


TAD is carried by AV Designs in Malaysia, phone: 03-62411237.


May 9, 2021

Home Theater sound calibration

 Home Theater is pretty common this days in homes around the world. This can be as simple as 1 piece of sound bar to some pretty complicated multi channel surround sound. Mainly there are 2 main streams sound format, the DTS and Dolby. There are some other less popular like Auro 3D but is still about multi channel surround sound. With multiple sound mix created for movies over the years it has evolve quite far from the old days of 2 channel sound. The most common setup will be 5.1 or 7.1 although the current sound format do have multiple height or ceiling channels. Even with just 5 or 7 channels is still not that simple of getting the sound to be balance or be seamless. Many home users don't really understand on how the sound is mix or how it is intention for the listener. Challenges face by home users like example of vocal in movie is too soft, or sound effect is too much, or worst even lack of bass (LFE). I am one of those guy who faces this kind of challenges until I understand how important is for sound calibration to address those examples I have mention.


First thing when someone bought an AVR (Audio Video Receiver), looking at the manual is probably something scary. Sometimes just connecting up the cables is also a challenge. Of course, lets say you are connected up accordingly and you are ready to enjoy your movie. The next thing you notice is the sound doesn't quite right. Looking at AVR with tens of buttons and switches it can be rather overwhelming. Lucky thing is most AVR have something to help users out. It is the auto calibration function. Different company do it differently but the goal is the same, to get the sound to be right. In my case, I am using the Yamaha processor (CX-5200). This is not an AVR but a processor for the video and sound only. The main difference is the processor has no power output but AVR is all in one box. That is totally another different topic. Now in Yamaha's case it is the YPAO or like Pioneer will be MCACC or more exotic brand like Lyndoft or Arcam will be Dirac. Lets not get too far on that but each has its own way of doing the auto calibration. 


To start, auto calibration need to have some kind of instrument to do the measurement which feed information into the AVR or Processor to do the sound adjustment. There will be mic to use in case which will be provided by the manufacturer. Again different manufacturer do it differently but the basic concept is the same. Yamaha provided a 4 point stand together with the mic. The reason for this is to measure height speakers vs ground level speakers. In this picture, you can see that I have install the mic on a camera tripod. Is just makes it simple, of course can put it on anything you like. The key thing is the measurement should be at ear level on your seating position. The reason is pretty simple, you want the sound to go to your listening position on that specific height for your ear to get the sound correctly.


As the name suggest, auto calibration is pretty straight forward. Just connect the mic to the AVR than start to run the software. YPAO in this case for Yamaha which you can see on the pic. Is just something the YPAO to calibrate according to the speakers that is available. Instruction will be popping up according to the calibration as it run. Once the auto calibration is complete, it pretty much done and ready to rock and roll. 


The additional step which I was to level the individual speaker or channel. As suggested by Dolby or DTS that the reference level should be abour 75 db for each individual channel. So here I use the Umik-1 mic with the REW software as SPL (Sound Pressure Level) meter. Even more simple is to use your smart phone and install the apps. The difference of this is the measuring mic which determine how accurate the sound level. 


This is the screen in the Yamaha to adjust the level according to the SPL reading to get to 75db. This is not a must but is good to do this. The important reason for doing is to ensure the sound is all even. Doesn't matter what is the speaker or size. It should be the same level so that the sound does not over power each other. This also apply for the subwoofer. After this is done, proceed to enjoy the show. 


May 6, 2021

Netflix here I come! Google Chromecast 3rd Gen

My kids have been subscribed to Netflix for a year or so, how ever so far they are only watching the programs on their smartphones. They made a request to Papa bear, so that they can watch Netflix content on the big screen, and what bigger than all of 120 inches of screen?

And off I went to KL's IT Centre, Plaza Low Yat for a solution. It was suggested that I need to get a Google Chromecast! And for MYR225/Unit, it was not too expensive either. Google Chromecast is a HDMI plug dongle that will go in to any of the HDMI ports of your TV and in my case AVR. I went home set up was indeed a breeze, as all I had to do was to plug in to an available HDMI port on my AVR, namely CBL/SAT. Connect the Dongle to the walwart power supply that came bundled in the package. My kids then went on to set it up with their smartphones. In 15 minutes or so we are watching movies on Netflix! 

Google Chromecast 3rd Gen


Set up was relatively straight forward, you basically follow the intuitive on screen instruction with a couple of "yes or no" choices and key in your wifi username & password, then TADAA! You've got Netflix, YouTube  and other contents on the net via your smartphone to your TV or AV system. One caveat though, you wifi signal needs to be strong in order for Chromecast to work. My AV room is located right at the corner towards the back of the house, so naturally wifi signal has diminished at this location. Hence another problem to be solved. I bought a TP Link AC 1750 wifi extender and problem fixed! 

This happens when wifi signal is weak

Watching Netflix or YouTube experience on the big screen depends very much on the file source available. On Netflix especially there some files source that is Full HD good and some at 720p. Streaming those 720p on my 120 inch screen looks pixelated and overall, not a good movies experience. Streaming Full HD with Dolby D+ as soundtrack, the movie experience comes close enough to BD level.

Now with Google Chromecast installed, family time during this MCO just got more intense, binge watching horror movies & series. The kids do love a good scare!   

May 2, 2021

No longer headless


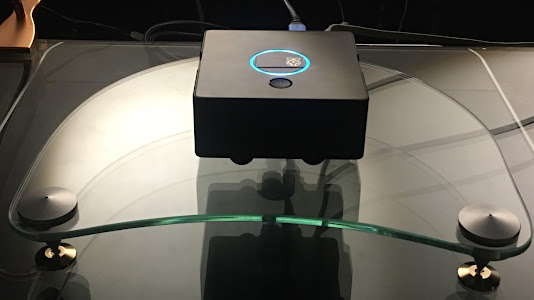
So what is so headless about ? In computer or digital world , headless pretty much is saying that you are operating some hardware without a screen or keyboard. Practically you don't see any kind of interaction with the hardware. What is in the picture is a DIY box of music player / streamer. The inside hardware is a single board computer (Asus Tinkerboard S) loaded with volumio O/S. The idea of it is to have a remote without the need of any kind of display which is convenient.


Although this is what the whole intention is about but no doubt sometimes it will be also nice to have some visual while we are enjoying our music. Even we listen with our ears but something nice to the visual is always a plus point.  After all, hifi is an entertainment. It does make sense to make the environment to be as good as possible. Of course this also meaning that what we see during the listening is critical in adding on to the enjoyment.


So here it is, I have added a small monitor of 11 inch in size to the unit via HDMI. The Tinkerboard do support A/V as with its HDMI capable of 4k resolution and even atmos / dts X surround. That is another story. So is pretty use to have a monitor add on to it to have the nice display of the unit. The display is pretty standard is showing what is playing, volume level, the minutes, play, pause. I guess with the display you have a sense that there is something playing behind the scene of the music. This is a standard fullHD monitor but it does work with touch screen monitor too. Initially I was thinking of touch screen monitor but is quite a bit costly. I am happy to settle with this. Very much happy with it and will surely enjoy my music a lot more to come.