Showing posts with label CD Player. Show all posts

August 23, 2023

Old Gold! Denon DCD-3500RG CD Player

The official release photo of Denon DCD-3500RG CD player back in 1989, that's 34 years ago!


As you keen followers have noticed, I have gone in to reverse gear when it comes to hifi since the last couple of years. I usually do not go too far back, but have stuck to the time line of 80's & 90's classics, that's like 30 or 40 years ago, which I felt hifi was at it's last golden age. This Denon DCD-3500RG CD player is probably one of the flagships made by the company over the years. I've had various Denon products over the years, and they are always technically correct in sound, but just never really hit my heart strings. However, this Denon CD player promises to be something different, and I've been waiting for my chance to find out since like 25 years ago. I was always eyeing for a good condition pre-owned unit for sale, but either I was always too late or just got distracted when one became available.

This unit belongs to a friend and as he was getting bored with it, fancied my proposal for a swap with my Teac VRDS-20 CD player, he wanted a small top up but that's fine, since I was bored with the Teac too. For me after a while the Teac with it's VRDS transport should have shined, but never got me emotionally wowed with music. Maybe it wasn't meant to be for me..........   

The CD loading tray come with built in suspension! A feature that is deemed redundant by now.

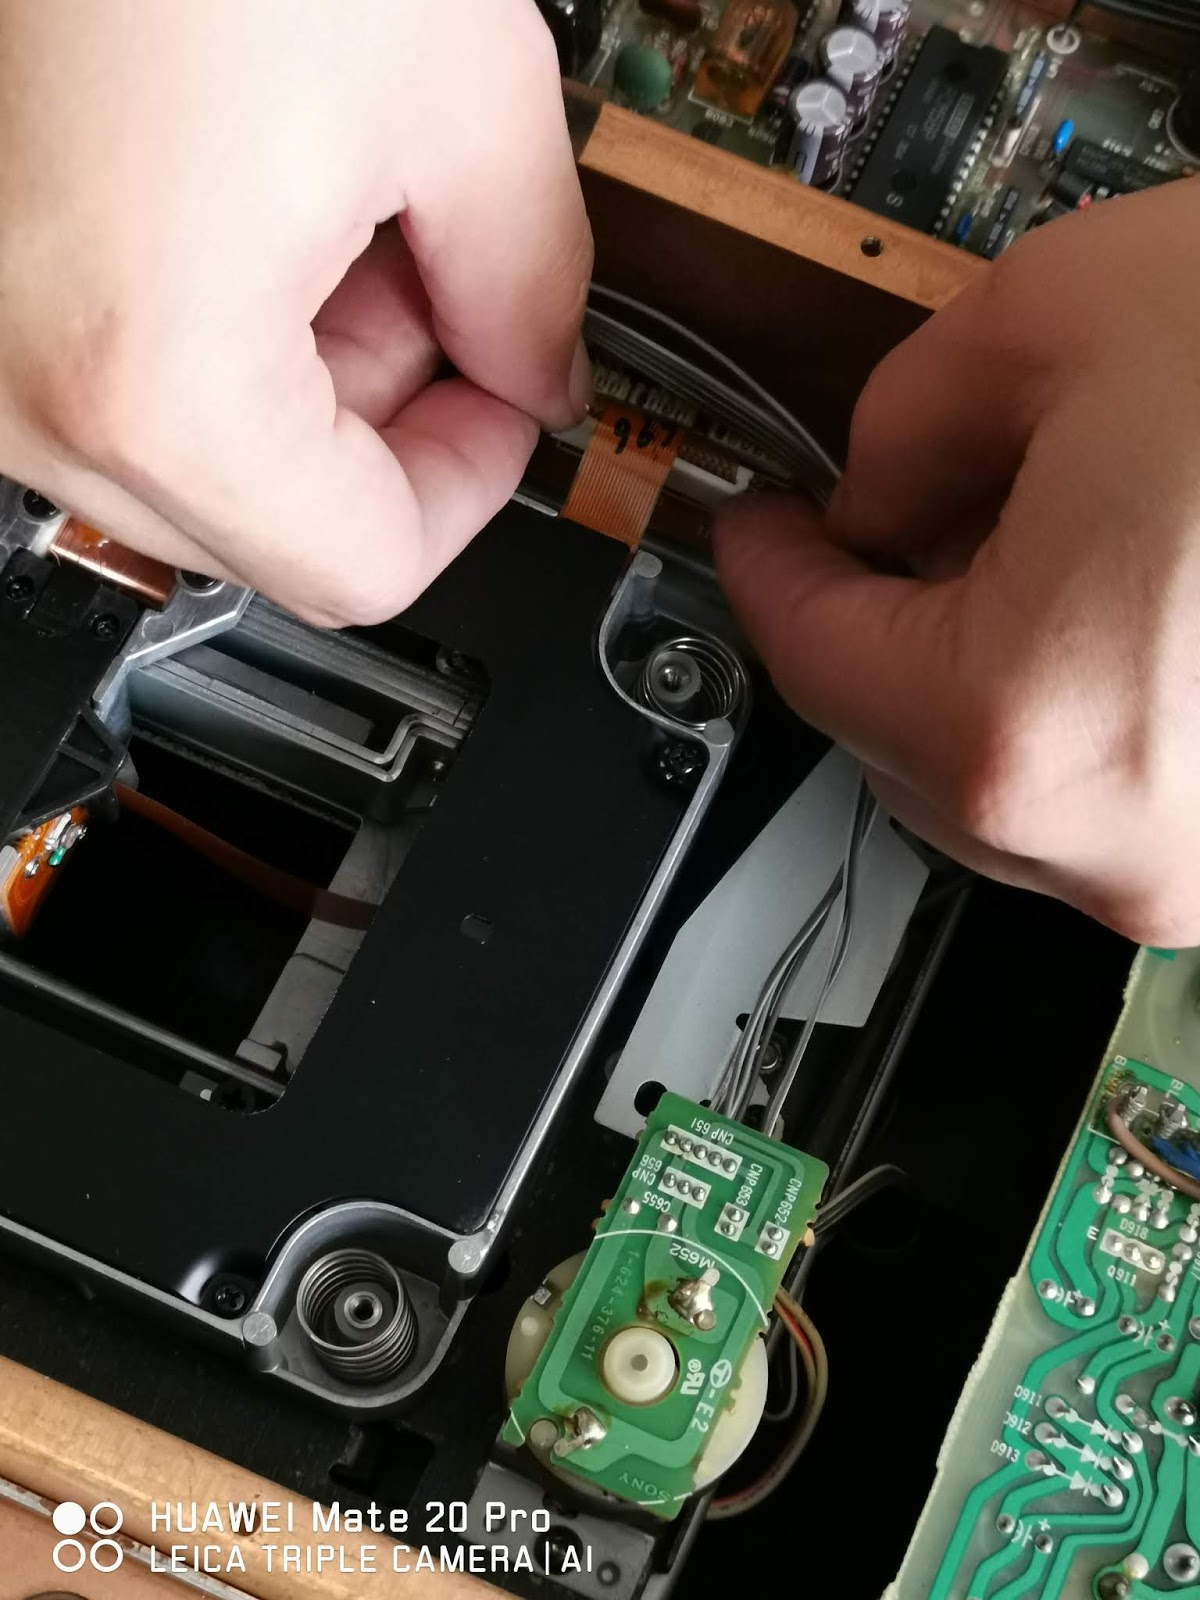
The Denon DCD-3500RG was launched in 1989, just towards the start of 2nd generation of CD players and it still have many features from the first generation machines deemed un-necessary today, like the suspended CD loading tray, the top Sony KSS-151A CD transport with magnetic rails, track programing calendar and best of all not only wooden cheeks, but the whole top & side panels are real wood finished in dark tone Urushi lacquer, which is very classy. Now a days, if you want your hifi equipment to come with that Urushi lacquer, be prepared to spend at least 6 figures or more! However, for the unit that came to me, that Urushi wood panels were termite infested and I had to sadly remove, throw away, and make new Nyatoh hard wood panels for it! The results, while not glossy like the original Urushi lacquer, came with it's own unique hard wood surface texture charm which is still nice. I can't get anyone to do Urushi lacquer restoration for me locally. Lastly this Denon uses a theoretical 18 bit decoding, courtesy of 4 units Burr Brown PCM58P-K, 2 per channel for balanced circuitry linearity. 

The Denon is another satin gold(not Champaign gold, as the tone is less rich, and a bit pale in comparison), battleship build quality CD player that weights in at 22kgs, came with all round copper coated 2 compartment chassis, which on the left was 2 power supply transformers(1 for audio & 1 for digital, so it says) at the back and the Sony KSS-151A transport in front, with the right compartment holding the dual mono audio PCBs. Very nicely organized. The front fascia is relatively clean with just a few buttons flanking the big CD tray & FL display, all other lesser used buttons are buried inside a flap below.  The back panel has the usual digital output, RCA & XLR audio outs.


The insides of the Denon DCD-3500RG CD player. Nice, right?

 
To reduce fascia design clutter, only the most frequently used buttons are left on the outside, all other buttons are hidden behind a drop down flap below. 

The back panel outputs.


My Denon DCD-3500RG after the wood panel changed, looks quite different doesn't it? Some may say the different wood panels will color the sound differently, but I didn't really heard that.


So far so good, however for a Denon, this CD player is really sounding something else! From the first CD play, I was transfixed by the sound. The bass was strong, bold and tuneful. The mids are slightly recessed, a little laid back but still very engaging. The highs are super refined, very airy but will bite if the music calls for it. The sound stage is big, but very laid back. Overall this CD player certainly has the PRAT factor, which make music very enjoyable. So far all is good, but comparing to my stable of CD players, this Denon does not sound as dark in tonality vs the Sony CDP-X7 ESD, it self a 1988 product. Then comparing to the Accuphase DP-70V which is a more aspirational product and priced(at least double?) to match in 1992, the Accupahse offers slightly more clarity, less digital haze(compared to both Sony & Denon), gives better mid range texture and just maybe slightly better micro dynamics and transient. If there's any comparison I would say both the half priced Sony & Denon offered possibility 85-90% of what the Accuphase can do. However, with most pop & rock recordings it's not easy to tell them apart. Only certain high quality recordings that truly allows the Accuphase to shine, put it on the pedestal, so to speak!

An area I do not like about the Denon is that it doesn't play CD-Rs & scratched disc too well. Only well kept original CDs will do here. But for me, this is no limitation, as I have the other 2 CD players in my stables that will play any disc any condition, especially the Accuphase. I strongly suspect the Sony KSS-151A transport laser in the Denon to be in it's last legs(since 1989!) and it will be a costly affair to source for replacement once dead. However, I feel this Denon is worth saving and to keep it going if the worst should happen. 

Even then, the Denon DCD-3500RG has been in my stables for over a year, and I must say that I've totally enjoyed it's musical company so far, and will be in my stables for a long time to come.

April 19, 2022

VRDS Dreams, Teac VRDS-20 CD Player

Teac VRDS-20 CD player. The bottom footer at the bottom of the four corner pillars are adjustable for height and compensate for stability if one uses a spirit level

I've always wanted an Esoteric or Teac VRDS series CDP. So when this Teac VRDS-20 unit appeared in the classifieds, I wasted no time making it mine! Amongst the Teac VRDS series CDPs, I feel the VRDS-20 is a bit of an odd ball, styling wise. It just looks like a VRDS-7 or 10 but with 4 pillars on each corner which comes with adjustable metal cone feet! I guess a bit of audiophile touches here & there wouldn't hurt. The funny part is the next in line, the VRDS-25, reverted back to the generic square box of the VRDS-10 looks! Otherwise the Teac VRDS-20 share all the family looks of the VRDS series CDPs from Teac of the early 90's era. The Teac VRDS-2- was sold from 1992-1997, and that was era of the TDA-1547 Bitstream DACs from Philips, which this unit uses a pair for it's balance output configuration and also technically, to give a more linear frequency response on both L & R channels.

This Teac has a very brutish business look, and the chassis is at least double layer copper coated in no less than 8 internal compartments. The internal construction has a no expense spared look, which I like. This unit is using the mid tier VRDS mechanism, essentially a heavily modified Sony KSS-151 transport. As a mid tier VRDS, there are some compromises to be made, but overall I feel this is still acceptable as an engineering solution. The transport is not copper coated, the bridge holding up the VRDS clamp is not die cast metal, but some kind of bulk mould compound with enough solidness to anchor the VDRS clamp, which is again a compromised solution of compound coated metal, instead of copper coated aluminum of the most premium of VRDS.  My personal view is to disregard the later economy versions of  VRDS transports with bulk mould compound bridge & plastic CD clamp, like those that currently resides in the Esoteric K-05 series CDPs. The Teac VRDS-20 was available in Champaign gold or Satin black back then. I like that little quarter window on the top casing panel to allow viewing of the VRDS CD clamp at work.


The back panel is simple digital out, which includes Toslink & Co-axial on the left, a acptive power cord in the center, and analog outputs(RCA & XLR) on the right

My Teac VRDS-20 came with this OEM remote, but is functional enough with a matching Champaign gold color scheme

I plugged the Teac VRDS-20 in to my system, in place of my usual Sony CDP-X7 ESD, using it's balanced, XLR output. all else remains the same in the system. From the very first disc I spin, the tonality of the Teac was rather flat, with a slight mid range centric emphasis which make vocals stand out slightly in from of the sound stage. The Sony by comparison, while had a warmer tonal color, has a flatter less mid range centric presentation. The Teac also sounds slightly less detailed by comparison. 

Overall, the Teac has a very agreeable sound when listened on it's own merits. The highs are polite & laid back, the mid range as I have mentioned, and bass for my preference, could be snappier. Where it falls a little short is the emotional connection or musicality as normally referred as. At this level, I think the Teac has a slightly more dynamic sound compared to my very previous Marantz CD-16D which is a machine of similar sound specifications but only slightly more musical in presentation.

Form the 2 comparison above, i.e. Teac VRDS-20 vs Sony CDP-X7 ESD or Teac vs Marantz CD-16D, I feel the latter is more of a fair comparison as both are Bitstream implementations CDP clad in copper chassis, both are closer in price point, but both using different transport & other audio parameters of CD player build up. If just looking by the eye, the Teac looks the winner with it's more impressive transport, multi layer/compartment chassis & internal layout. The Marantz however do sound somewhat better musically if judge using one's ear. I think what could've being the final arbiter? The KI(Ken Ishiwata) factor I guess, the man's not considered in the industry a "Golden Ear" for no reason!


The impressive innards of the Teac VRDS-20

Too bad the Teac VRDS-20 coaxial out didn't managed to signal lock with the input of the Teac UD-501 DAC, otherwise another sound dimension may have been possible!  

After playing the Teac VRDS-20 for a few weeks, I thought I'd try plugging the VRDS transport to my newer Teac UD-501 DAC using a co-axial digital cable, to see how the great transport can compliment a newer design DAC. The UD-501 is using the much newer AKM DAC design capable of DSD decoding, which itself is the manifestation from the continuous development from Bitstream. Unfortunately, for some reason, the Teac UD-501 DAC refused to lock in to the VRDS co-axial digital signal output once the cable was connected. I tried a couple of times but to no avail. You've gotta give up at some point, right?

Finally after like more than a decade of lusting after a Teac or Esoteric VRDS type CDP transport, my dreams came thru with this but only with a slightly underwhelming feelings on the musicality factor. Perhaps a slightly more musical cable can elevate the Teac VRDS-20? one only has to try.........  

February 6, 2021

The Entry Level 2021, A New Set Up

The Entry Level Set Up

It's been a while since my last article, but it doesn't mean I have not been busy. If you've been following my restoration of a pair of  Acoustic Research M6 Holographic Tower Speakers, link here if you wanna read: http://hifi-unlimited.blogspot.com/2020/09/another-classic-restoration-acoustic.html

A buddy of mine have been rather keen to take it up for use as a simple system to relax in his bed room. However, he is an everyday guy with up to date everyday needs, meaning he wants to wireless stream music & remote control the system from his smart phone, plays MP3 music files on a USB stick and the occasional CD, if he is in the mood for sound decent sound quality. His needs are more of a practicality & connectivity, with absolute sound quality being less of a priority. i.e, he is not strictly dyed in the wool audiophile, but rather someone who wants decent sound quality, but with connectivity of a modern lifestyle system. And yes, he has provided a budget for me to work on too!

I set about studying the features he needs and the available components that will meet his requirements. but yet still providing high enough quality sound, while meeting his budgetary concerns.


Teac PD 650-B CD Player With USB Input

After going through the products that meet the budget, and lifestyle vs sound requirements, I have decided to start the set up with a CD player c/w front panel USB input for MP3 convenience, which lead me to the Teac PD 650-B model with see here. Retailing at just MYR 1380/unit, it's quite possibly the cheapest CD player with USB input and hifi brand credibility. After all, Teac used to make many good studio grade components. 

The plastic finished front panel still looks & feels solidly built, despite it's humble price tag. The satin black finished unit still looks & feels very decent to touch. The weight is not too heavy of course, but enough not to make it feel cheap. The central CD drawer design ejects in & out smoothly and all front panel buttons work with an reassuring "click".  The unit comes with a basic plastic remote for convenience too.


Yamaha R-N602 Receiver

The next star in this system line up is the amplifier, the heart of any self respecting hifi system, or in this case rather, a receiver, which in these days seems to be making a comeback of sorts. This Yamaha R-N602 is handsome, with pseudo classic looks that is functional and well built at one go. The Yamaha comes with all the modern feature that any audiophile or otherwise could want in a receiver. It has built in wifi, which could be wireless or wired, USB input for smart phone connection or just for playing MP3 music files, and it even connects to your smart phone via Bluetooth. Last but not least, once wifi is set up & connected, one can down load Yamaha's Musicast  app to your smart phone to access the Yamaha receiver wireless. Musicast app can be used as a remote control function or, play music flies stored on your smart phone. As a bonus, the receiver also come with FM/AM tuner.

The Yamaha receiver is rated at 80W RMS power output and the internal bits, such as beefy EI transformer for power supply, and over size heatsinks tells me the hardware is serious stuff! There are multiple RCA inputs at the back and the amp section can drive 2 pairs of speaker at once if required. 


Acoustic Research M6 Holographic Tower Speakers

The speaker in this system is my recently restored Acoustic Research M6 Holographic Tower Speakers. These are considered pinnacle of 90's speaker design and frankly, it still sounds pretty darn good today. Tonal balance is on the rich side of things, and the speaker is capable of projecting a big open sound space that is very transparent, yet managing to sound musical. With a built in sub woofer at the bottom cabinet, a nice weighty, low bass is there to anchor the music. This is an efficient speaker design and the Yamaha's 80W RMS feels comfortable pushing this speaker to it's fullest potential.

Ancillary items used in setting up this system includes a pair of Cardas Hexlink 5C RCA cable, a pair of Belden speaker cables, and a Weiduka AC2.2 power bar for power conditioning. Setting up the simple 3 component system was easy as A,B,C!
  
Once hooked up, the overall sound of this system was high musical of the foot tapping kind. I played The Best Of Yazoo CD from the Teac CD player and I was dancing to the music. Yazoo's blend of punk pop fusion music is synthesizer heavy and can sound distractingly jaunty and tiring in the wrong system, but here it actually sounded very nice. The near neutral tone with just a tinge of warmness from the Yamaha saved the day. Now, how did I tell who was doing what sound wise?

You see, both the Yamaha & the Teac allows USB input, and that is where the similarity and sound differentiation can be easily identified. When playing some of my old Canto pop music on MP3 via the USB stick, I first plugged in to the Teac CD player and then do the same via the USB input of the Yamaha  receiver. From the Teac, the sound was as per described earlier as playing CD, only less details and resolution, and maybe just a tad higher noise floor(white hash basically). However the same USB stick played via Yamaha, the sound turned even more musical, more danceable, and those MP3 files gained an analog like texture which to my ears are more sympathetic to the low res files. I also managed to stream music to the Yamaha from my smart phone and got very good results as well, with no signal drop of or anything as such.

I find it highly satisfying being able to enjoy music from an entry level system, costing even less than most of those high end cables that audiophiles prized. With the latest crop of budget hifi products on offer as represented here, I see a glimmer of hope for an industry coping with changes of modern life style. Lovely indeed! And lastly, after setting up this system in my buddies house, he sent me a thank you note, saying he was very satisfied with the sound of the system and will be so until he hit the jackpot, then he will consider an upgrade! 

For this project, I did all my shopping at Style Laser in Kuala Lumpur, a cash & carry outlet. 

September 20, 2020

Rebooting The Final Frontier! Sonic Frontiers SFCD-1

The Sonic Frontiers SFCD-1 was produced from 1995 till 2001. It's probably one of the most musical sounding CD players ever made at any price, even by today's standards! One listening an you'll fall in love with it's charms. By today's standard noise floor & resolution would be it's Achilles' heels, but it's golden colored tonality, rhythm & pace,  sheer musicality will get you hooked.


Here is a Sonic Frontiers SFCD-1 which I used to own sometime back in 2005 till 2007, then I sold it to a friend who loved it so much, he sent the unit to Chris Johnson's Parts Connection in Canada to have it retro fitted with SE Plus mods to the player during 2011. In all he blew a cool MYR 10 thousand bucks or so to do it. Worth every single Agung faced Ringgit, he said, upon the return of the SFCD-1 about 3 months later!

Me? The SFCD-1 was actually my first high end CD player. It sounded great in my system, but I took it for granted, I wanted more........... My next CD player was a Marantz CD 16-D which served as an interim player until I lay my hands on a Marantz CD 7, which was the unit I've always wanted. You can read about my adventures or mis-adventures with the Marantz CD 7 in these pages too.

Back to end year 2019, my friend came for a home visit when I told him I had restarted my hifi hobby. He was inspired and went home looking to restart his too. Like me, he too had moth balled his hifi set for a couple of years. Then he told me his system wouldn't start.up. Chiefly, the Sonic Forntiers SFCD-1 wouldn't turn on! He brought the unit to me in hope I could fix it. 

I opened up the player, and found that the main board still powered up, but the control board behind the face plate with the display wasn't. I had deduced my findings to him, that unless I could find a donor board with the E-prom chip still intact. There wasn't anything further I could do for him. He then told me it's OK and I can keep the carcass. The SFCD-1 laid in my place for a few months, until recently I heard that our chief hifi mechanic Mr Oh of Old Klang Road have a working unit of SFT-1(a transport only version of the SFCD-1) for sale. And so I sprung in to action. Looking to buy the SFT-1 to use as a donor machine, or to shop for parts. Mr Oh learned about my intentions and offered to help me with the parts transfer task. Below is a pictoria guide with photos provided by Mr Oh as he did the transfer job!      

The Sonic Frontiers SFCD-1(black face) and SFT-1(gold face) being wheeled in to Mr Oh's surgery room for parts transplant!

Inside the SFT-1, compared to the SFCD-1 below.

Inside the SFCD-1, note the balanced(XLR) output board and the pair of 6922 tubes(NOS Siemens matched pair), and the added on jitter board on top of the Ultra Jitter module as part of the SE Plus upgrade package performed by Chris Johnson, formerly boss & designer of Sonic Frontiers products.

The 2 round stacks of fast recovery diodes in between the blue & gold colored capacitors are also part of the elaborate SE Plus upgrade package! 

Audio output section of the SFCD-1 beefed up with ceramic tube sockets, MCaps and gold pin XLR connectors for the SE Plus upgrade package!

The SE Plus upgrades also includes more power regulators in the power supply section.

After the control board swap, the SFCD-1 came alive again!

While it didn't affect my SFCD-1, a very common problem with these CD players are the board socket pins as circled in red by Mr Oh. Over the years of usage, the pins can become loose and cause shorting of boards, or just becomes loose and the unit stops working! One way is to tightened the socket pins by using a cable tie, or better yet ask Mr Oh to individually remove the pins from the socket, give it a good press to tightened the contact points. A lot of work though. 

During testing of the SFCD-1, Mr Oh also found the CD transport needed replacement, along with the servo board, which is non-standard Philips CDM 12.4. Sonic Frontiers had modified the servo board.

Thankfully, the SFT-1 again provide the required donor CD transport mechanism servo board.....

All fixed and under going final test.

Finally, the Sonic Frontiers SFCD-1 is now singing in my audio cave again.
 

I shall take my time to enjoy my new found SFCD-1. As I listen more to it, the more I love it's golden tonal colors, it's rhythm & pace and slam dunk musical qualities. These are the very things you can't find in modern CD player designs or CAS audio. That's why I believe the Sonic Frontiers SFCD-1 will live on for many, many years to come, and their used resell values will go up, despite their troublesome reputation. They just sound so...... musically good, compared to most modern digital designs which excels mostly in technical parameters, like specifications & measured results!

Now, latest development, my friend just learned that I have rebooted his SFCD-1 and is keen to have it back after he listened to it in my place. Knowing how much he loved his Sonic Frontiers products, I'll let it go back to it's rightful owner for the cost of repairs. What did I get? if you asked, the sheer joy of being reminded why I liked this CD player so much back then! A lovely ending, don't you think so? 

July 31, 2020

Phono Classic Restored, Marantz PH-1 Phono Stage


Those 4 nondescript looking feet at the bottom are actually made of the same die-cast metal alloy as the side cheeks. It adds to overall weightiness of the unit


Front & back panel of the Marantz PH-1 phono stage, in some countries, Marantz called it the PH-22 phono stage, with a 230V power supply system

In 1991, Marantz introduced the Music Link series of half sized audiophile quality components to the Japan market, in view to accommodate the new lifestyle of coping with smaller, yet ever increasing property prices. The Japanese economy was at it's peak at the time, just before the bubble burst a few years down the road. Some studio apartments or SOHO as they are called these days, in Japan of that era could be only slightly bigger than my 12ft x 10ft audio cave! It was something that most young working adults could afford in the mega expensive cities of Japan. Expensive properties aside, these young working people also wanted high quality music in their daily lifestyle, right?

The Music Link series comprises of a jewel like top loading CD player, phono stage, pre-amp, and mono block amplifiers as shown below. Some Japanese Yuppies even going as far as having 2 pairs of mini mono block amplifiers to bi-amp their bookshelf speakers! As you can see below, Marantz even have an optional, sold separately matching component rack to house the whole system on offer.Obviously, now you're aware that the Marantz Music Link series concept components are JDM only. And possibly some small volumes were sold in Germany where these well built, Champaign gold finished units were well loved.  
Top loading Marantz CD-23, Music Link series CD player, very nice!

The whole Marantz Music Link series, from clockwise: Marantz SC-22 preamp, MA22 mono block power amp, PH-1 phono stage, & Marantz DAC-1, which is self explanatory. There is also a dedicated rack, designed to match the Music Link components.

Now with the introduction of  Marantz Music Link series finished, let's go back to my story. I have been Linn LP12 sick for some time now, and missing it a lot more after listening to a newly acquired unit in a buddies system. The Linn LP12 sound just stuck in my mind and nailed heart for good. The agony went on for days and months. I was kicking myself in the ass every time I thought about that silly decision to let my original LP12 go to a buddy. I knew I would just have to sulk it in and get another Linn LP12 unit one day soon.

Having those thoughts were very dangerous liaisons indeed, as I only have a simple system that consisted of a CD player, turntable, preamp with built phono stage & power amp. How would I connect the eventual Linn LP12 in the system? An extra phono stage was the obvious and only answer........

As soon as those thought crossed in my mind, this dinky Marantz PH-1 popped up on our favorite local hifi classifieds. It was not cheap and had to work with a 100V step down converter(this is a Japan Domestic Model, remember?), but then again, good things no cheap, and cheap things no good either! right? In many ways, I am very much like those Germans who like their hifi finished in matte Champaign gold, hmm..........

A Goggle search reveals this dinky PH-1 phono stage is still a prized collectors item in Japan and that it had a pair of MC step up transformers built in for MC input............. now this is where it really got me interested! Not only that, the MC gain stage is up to 68 db, which is more than enough for even the lowest of MC cartridge outputs. I contacted the seller, but he could not demo the unit, since he had already let gone his turntable, but he assured me money back guarantee if the Marantz PH-1 didn't work, and even threw in the voltage step down tranny that he was using to sweetened the deal. And so I took a chance.....
The over view inside, note the side mounted potted 100V power supply transformer, too bad I can't get an 230V equivalent of the same size!

I went home and proceeded to hook up the PH-1 to my existing Kuzma Stabi turntable since I didn't have a Linn LP12 yet. I connected all the power cord & interconnect , power up and the blue indicator light didn't turn ON! I called the seller and he was surprised when I told him the unit was not working. I told him the indicator light didn't turn ON, he was puzzled and asked "What indicator light?" After a long explanation, he realized what I was going about, and he told me that he never saw any indicator light ON from the very first day he brought the unit back from Japan, but he assured me once I put on an LP and spin it, I should be hearing it! I did just that and it sang.........., the Marantz PH-1 sang!

This tells me 2 things, first the noise floor of the Marantz PH-1 is absolutely non-existent, zero, zilch! It was dead quiet like as if it was never turned ON, but only fact that it was turned ON! I was really impressed. The next issue is not so positive, it means I have a dead LED indicator that needs replacing. 
See the 12V bulb in the housing located behind the front panel?

Time for a little DIY action since I am also a little curious about what's beneath all that very nice matte Champaign gold finish? I took a quick observation on the dismantling points of the copper coated chassis, with die-cast  side cheeks and the 4 feet. The first thing I noticed was the weight of quite a few kilos for such a dinky half sized component. The Marantz PH-1 can be said to be built with pride inside out, as you can see from all the naked pictures here. All parts are either audiophile approved where mattered, or straight industrial standard which are made for long service life. Once the chassis is opened up, we can see the power supply section on the left side which is partitioned by copper coated plate for shielding, the pair of MC step up transformer on the right, and the actual, MM phono gain stage board right in the center of the box. The thru hole PCB board quality is excellent for 90's era audiophile grade product, but will be bettered by today's typical SMD type high end PCB. For DIY-able repairs, I always prefer the 90's type thru hole PCB boards. SMD PCB boards may have some sonic and appearance advantages, but will be almost impossible to DIY repair!
The actual MM gain stage section of the Marantz PH-1

I easily removed the so called LED or what looks like an actual light bulb, located just behind the front panel power ON indicator housing. I went to Jalan Pasar electronics street in search of the replacement, which was identified as a 9V bulb by the spare parts vendor, who ask me if I am repairing an old TV or radio? He said "this bulbs have been obsolete about 15 years ago, I only have a few pieces left. Once I sold them, they are gone forever!" After I hearing that, I bought 2 extra bulbs to spare. They cost 3 times the price of a 5V LED. No wonder these bulbs are obsolete! 

Upon return I tried to power up the bulb with a 12V battery, the ones you used to power your Smart Tags! The bulbs light up with a warn yellow glow of a regular house hold bulb, but 1 or the 3 pieces blew up in smoke as soon as it lighted........ And so I begin to solder the bulb's connecting wires to the power supply PCB, test power ON, and perfect! And I still have a spare working bulb, just in case for the future. With that I closed the chassis and it was time to hook the Marantz PH-1 to my system again.
The pair of nicely potted MC step up transformer as seen from top! 

The MC gain set to L(only 2 settings available, L or H) and played around with the Equalizer setting I to IV by playing an LP on my Kuzma Stabi turntable. The gain was enough for the 0.4mv output of the Benz LP cartridge and the equalizer setting I seems to sound the best of the four.

After days of playing with the Marantz PH-1, I am again reminded of the late Ken Ishiwata's signature voicing here. The highs are lush, very laid back with just enough mid range lift to maintain the magical female vocal presence in play. The bass is soft in texture, but yet each note clearly defined. On the whole a very relaxing kind of sound that is typical of JDM hifi product tuning. However, I am still mesmerized by that total absence of noise, be it hiss or any other form. The softly polite sound of the Marantz PH-1 stands in total contrast to the built in tube phono board of the Aesthetix Janus preamp, which is big scaled, bold and very hard driving, which made it perfect for rock, blues & club music in general.

Now with the Marantz PH-1 ready and waiting, it's only a matter of time the Linn LP12 joins the party. Stay tuned, while I take my time to warm up the Marantz PH-1 phono stage.
Today's version of the Marantz Music Link series which is simplified to consist of a CD player, and an integrated amplifier with head amp built in. It's called the Marantz HD-CD 1


June 21, 2020

SOTA 1989, Accuphase DP-70V CD Player

It was some time during the summer of 2018, I was in Hong Kong, had the weekend there to myself after a few days of work. The idle mind became the devil's workshop. I was't really in to hifi at that stage, being very contended to be away from the scene. But somehow, there was 48 hours of idle time to amuse my self, and began wandering around the electronics retail areas of Mongkok & Sham Shui Po.

There are 3 specific areas of hifi retail in Hong Kong. For the newest and most mighty all hi-end scene, there is always the snooty Admiralty & Central area. For the good mix of mid range & used hi-end stuff, there is always Mongkok area, while you're there check out the great local cafes & street food stall there too! As for Sham Sui Po, there is always a place for antiques, collectors of any sort, and generally old, & unwanted curiosities, hifi included.  

In Sham Sui Po, Ap Liu Street specifically is where my curiosity with Accuphase CD players started! Talk about contrasting lifestyle, shopping for hi-end at low brow, go figure!..................... There are a few shops in Ap Liu Street, specializing in either almost junk or collectible hifi, which are stacked from floor to ceiling. It's quite a place to behold. The shopping experience is not very pleasant to say the least. No auditioning is the rule, a request to audition tells the shop owner you're a time waster, a tire kicker so to speak, he will tell you to go buy from somewhere else. You gotta know your stuff when hifi shopping here, the only thing they will allow is a functional test after you're committed to purchase! 

It's inside one of those dinky little shops along Ap Liu Street that I came across some shiny, Champaign gold, super well built Accuphase amplifiers & CD Players. One that caught my eye was the Accuphase DP-70. If you're unsure....... Yes, Accuphase has 2 DP-70 models, one with a V and one without! I believe the DP-70 came first, followed by the face-lifted model with the V! Both look very similar, except for the button arrangements on the right side of the fascia, and the easiest differentiating feature is the display. The DP-70 sports a red LED display, while the DP-70V comes with a florescent green display, the only one to do so, since the first of all disc players from Accuphase till now! Nearly all Accuphase DP series CD players comes with either red LED or orange florescent displays.

The beauty & simplicity of Accuphase DP-70V CD player with only 4 control buttons on the right side of the front fascia. All other buttons hidden inside the bottom fold able flap.
I was smitten by that Accuphase DP-70 CD player, something about CD player designs from that late 80's till late 90's era always grabs my attention, just like all Bruno Sacco era designed Benz automobiles. However, like I said, I was as far away from the hifi scene as possible, and I didn't like the idea of lugging a 20kg plus box from Hong Kong to Kuala Lumpur. So I let it go and left things to fate.

By spring 2019, having forgotten about the whole episode in Hong Kong, my dear sifu asked me to check out the Accuphase DP-950 & DC-950 transport & DAC combo for him in Akihabara, as I had a weekend to my self in Tokyo! And so I spent the whole day walking around Akihabara hifi stores gawking at Accuphase gears. I wondered what was so good about the Accuphase CD players that got my dear sifu to want to check them out? Yeah! sure, we've heard a few Accuphase CD during our hifi crazy days, I think if you looked in to our home visit pages, you may even spot some systems with Accuphase CD players there. However, at that time, somehow we never given it much thought.  Ya, in case you're wondering, my dear sifu eventually got his dream digital set up. I said dream......... only because it cost more than six figures in price tag! And what a lovely sounding CD transport & DAC combo that is......... right up there, and maybe even better than some of the best CD players I have ever heard!
My unit of the Accuphase DP-70V, some say the early version without the V sound warmer, thus better. I have not compared, so can't confirm how that is! 
As fate would have it, sometime in late 2019, the Good(hifi) Doctor, Oh have one Accuphase DP-70V in his hands to let go. And this time, I took thing more seriously, I went for and audition, yes I can confirm the Accuphase DP-70V sounds very good indeed, but better sounding than my Sony CDP X-7ESD? Hard to say, but the price was tempting, and off went the silver bullet!

Now mine, the State Of The 1989 Art Accuphase DP-70V is 21kgs heavy, built up to Yamato battleship standards and finished in the classic Japanese Champaign gold with glossed wood cheeks. The CD player also come with XLR output besides RCA, among other digital inputs & outputs. In general, I do not buy hifi that does not have XLR connections. Most Accuphase disc players uses Sony transport mechanism, and it's no surprise that this one is using the KSS-190A with the BU-1C or 1D laser head combo. So I already have a standby Sony KSS-190A for either of my CD players should the need arises, how convenient!

On the DAC side is a pair of 20 bit chip set, implemented R to R style, mated with 8 times over sampling filter completes the picture. That's state of the art multi bit chip set implementation, all the way to the 1998 swan song, the Marantz CD-7 which I previously owned.  if I seemed to go round & round back to this golden era of CD players, so be it!

I have a belief that the 1st generation of CD players were designed to overcome technical limitations with focus on functionality & reliability. 2nd generation CD players like the Sony CDP X-7ESD & this Accuphase DP-70V, sports some major technical advancement over their predecessors and were designed with more sound performance improvement in mind. Early CD player developments were bench-marked against the best turn tables of the time, sound wise. From the 90's on wards, CD player developments started to bench-marked against previous top CD players for sound. I think this is where the first mis-steps of Digital players start to deviate from analog bench-marking. It is my speculation about why newer, more technologically advance digital designs start to sound more digitized, more details, lower noise floor but yet at the same time, less natural sounding, compared to the early multi bit CD players, which tends to sound more analog, more life like even!
A look at the front, back & top of the Accuphase DP-70V, note the opened flap at the front bottom panel.
The Accuphase DV-70V follows the sonic signature of the Accuphase sound, very detailed, yet presented in a very organic and slightly rose hued tinted fashion. Compared to my Sony CDP, the Accuphase had very delicately voiced sound, much like the late Ken Ishiwata curated sound of the Marantz CD-7. Some of my buddies have a disdain for Accuphase hifi gear for this very reason. I don't, in fact I find this kinda sound very easily acceptable, and if synergistic with the rest of the system, can be the basis a great sounding system!

I am glad I picked up this gem of a CD player in my lifetime for a fraction of it's original retail price of USD 10,000 a pop! It's a few twist of fate all rolled in to one fine ending. So with this I decided to keep 2 CD players of classic late 80's vintage in my system. 

June 8, 2020

CD Transport Replacement, Sony CDP-X7 ESD

As mentioned in my previous introduction of the Sony CDP-X7 ESD, I had suspected the CD mechanism & laser head was at the end of it's long 29 years service life since new! The symptoms were there, the long disc loading times, some disc unable to detect TOC, or some disc won't either play at the first or last track, and most of all, if I had to skip or reverse a track, it will take a long time to cue, then play. I was looking around for a replacement KSS-190A CD mechanism if I could. I didn't just want to replace the BU-1D laser head only. Yeah...... you can say I like my spare tire!

Found a brand new NOS unit in eBay, to be shipped from Germany, but they wanted some thing like close to 700 Euros and shipping cost have not been factored in yet! I had to turn to my next most trusty source, my sourcing buddy in China. If it's made or available in China, this guy will find it!

And found me a whole KSS-190A unit he did! Bless him..... It's a refurbish unit, come with a test video of the mechanism sent via Wechat too! 2 weeks after that, I got my package from the courier and my replacement project can commence.

Here is a step by step pictorial guide with caption to help someone if any one wants to embark on a similar exercise.   
As mentioned, the Sony is very well built, and like the Marantz CD7 I rescued from the past, one needs to remove the top & bottom cover to access the CD mechanism, and everything inside! The CD mechanism is best accessed from the bottom but some action needs to be approached from the top too! Here you see the Sony up side down, awaiting surgery!

Before the KSS-190A mechanism can be removed, we first need to dislodge the CD puck holder from the top, pull the tray out, then turn the unit back to up side down position.

A close up of the full aluminium die cast CD tray. Very few CD players of today will use this very expensive way to make a CD tray. It's mostly made from plastics of varying quality.

Next the cable loom running thru just beneath the CD transport needs to be unclipped for easy access & removal. Note the 4 springs on each corner of the KSS-190A CD transport! Just like the Philips CD Pro on my previous Marantz CD7! 

The springs do provide the CD transport some degree of suspension from external vibrations.

Now we remove the main ribbon cable for signal, clipped with the white plastic finished locking cover.

Due to age, the handling of this ribbon cable is delicate to say the least!

With the original CD transport out from the Sony, can you spot the new vs the original? Neither could we! What, you think that I would be crazy enough to attend to something like this on my own??? Like I always do, I consulted Wong sifu! 

We couldn't spot the diference between the out going and incoming KSS-190A, until we found this little dot of solder which acts like a shorting plug for transport! The little solder dot needs to be removed before plugging in to the Sony. You'll need a heat controlled solder gun, and very steady hands for this job. Too much heat or too slow hand motion and the ribbon cable melts along with the solder lead! I left this step to capable hands of Wong sifu!


With the ribbon cable prep step done, the replacement CD transport in re-inserted back to it's proper place, be mind full of the cable loom running just over the transport, carefully aligning the cables back in to the white plastic twist clip to hold it in place.

Now it's done, that's how tidy things should be when doing cable management! While working on the CD transport, we also took the opportunity to replace the CD tray drive belts, by removing the little Mabuchi motor and cover assembly on the top right of the picture. Sony's attention to details is that they even cover all moving parts with a stamped steel cover, with the belt & transfer gear vaguely visible on the top right of the picture.

Note the super thick sliding rails on which the BU-1D laser head assembly sits on! The degree of over engineering evident here is astounding! Also note the green coated spring on the bottom left of picture, the other 3 springs are just plain finished, not sure why, but some thing to keep in mind in order to replace in the same position after removal. Also note the transport locking screw just above the green coated spring! be sure to unlock the screw after installation, otherwise the transport won't work during testing, and we found out the hard way!

Speaking of the CD tray belt change, the esteemed Mr Oh supplied me the necessary rubber belts. Bless the man & his treasure chest of audio spares! The small belt is the one you saw on the picture above. The bigger belt is buried much deeper inside the CD transport. 

Now that the CD transport replacement work almost complete, it's time to turn the Sony right side up and run some test. First, the CD tray in/out test, checked & super smooth! 


And now for the CD test, using my favorite CD, Pink Floyd's Dark Side Of The Moon!

Great results, TOC detected, the CD plays well, skip & reverse tracks work fast and paused checked!

With one final naked shot, see the twin XLR output trannies towards the back of the player? Sony never did balance audio signal on any CD player like this anymore! Just too expensive now days...... We proceed to close both the top and bottom covers and call it a day!

Withe replacement a success, it's back to enjoying the music. It took almost 200 hours or so for the refurbished CD transport to run in and start to sound good somehow. May be I am experiencing psycho acoustics  again???

With that I had successfully resurrected another flagship CD player from the dead, and living in today's throw away world, it felt really good to preserve a historic milestone of Sony in it's golden era. Sony today is never the same greatness in commitment to hifi quality again. I sent my dead KSS-190A CD mechanism back to my buddy for refurbishment, waited about 2 months, and finally my original KSS-190A unit came back as my back up transport. I plan to keep this Sony CDP-X7 ESD in service for as long as I could.

I love the sound quality of the Sony. It had a warmish tonal balance, compared to today's high resolution, strictly neutral tonal balance. I would say the Sony does not suffer in terms of resolution, but rather presents it without that fake glare, over detailed feeling of today's player. In contrast the Sony sounds soothing, with an tint of rose hued tonal balance, and what I love the most about it, that bad ass fat bass lines. This player can really rock and plays pop recordings really well....... so well in fact, that when compared to another player from the same golden era costing at least 3 times the price when new, the Sony gives away little in terms of sound quality. The more expensive equipment may sound different, but it's really not much better either! Yes, it's a Sony & it's as good as strolling down memory lane 1988 gets.