Showing posts with label My Home Theatre. Show all posts

December 16, 2021

The Giant Subs

Subwoofer or subs which most audio enthusiast will called. Everyone who into home theater or Hifi will not need introduction to a sub. Is a boom box so to called it. I am going to focus on this sub in a home theater setup. I call this sub a monster that I have recently change to. This sub which is non other than the JL Audio F212 V2 dual drivers subwoofer. 


The subs as from the picture is quite a tall subwoofer standing at 81cm, is like half size floor stander speaker. It also weight 102 kg. This is good enough reason to called it a monster sub. Each of the driver is a 12 inches ultra long throw W7 drivers. The power is 3600 watts RMS for this beast. It have both balanced ((XLR/TRS Combo) and unbalanced connections.


From the front panels left to right , power switch, daro connection, room optimzation (demo, defeat, calibrate). 2 LED indicators (Master/Slave), level mode, master volume, lights dim, low pass filter, trim, phase and polarity. This features are handy for calibration.


This are some of the accessories included in the box. One pair of gloves, the calibration mic and 4 pieces of sliders. This is very useful tool. It is use to slide under the foot of the subwoofer to allow easier moving of the sub sliding on the floor. I cannot imagine carrying this 102kg moving about in the room. I will give an extra point to JL Audio on this small accessory which is a big help.


A picture for comparison a floor stander speaker to the subwoofer. One good thing about having a sub like this is saving some floor space. Is like having 2 subs stack up. Thinking back before I was having 2 large SVS subwoofers is really taking up lots of floor space. This is a positive point for me. 


Digital Automatic Room Optimization (D.A.R.O.) system as the name suggest is a build in auto calibration on the subwoofer. I will describe as similar to how a mic is connected to an AVR and run the auto calibration. Basically is the same but this is done specific for bass management. As this is setup for home theater purpose, after running the DARO will than run the auto calibration in the AVR as follow up to complete the setup.


This is the graph from REW on the bass response. Blue line is the before applying any EQ to it. The redline is with EQ to flatten it. This is pretty amazing given the fact that this is just 1 subwoofer vs previously of dual SVS ultra subwoofers. Now the movie experience is with "kick". The bass slam is pretty real right smack to the viewer. Totally enjoying it. 

July 13, 2021

Endless entanglement

In home cinema world , one of the most common topic is endless entanglement of cables. The reason for this is very obvious as home cinema usually will have multi channel audios which means multi speakers placed in the room with cables connection running around the room. Many a times this situation has become like spaghettis of cables especially behind the amplifier where all the cables comes into, like speaker cables, HDMI cables, interconnect cables, power cables. Most people will try to tidy up a little but many will give up after. I can tell you is not an easy fit which I have tried various ways to keep tidy like cable ties. Even tried with different kind of racks to separate the component but usually it will end up with whole entanglement of cables. So after scouring youtube and reading some online tips, I realized that many professional home cinema setup is done with those server racks uses for IT data centers. I gotten some research done and learning from different tutorial videos on how to do it properly. Mid of last year when I got around it decided to get a 33U server rack and give it a try. What I mean by 33U is how tall the rack is. Hardware size is usually measure by 1U =  4cm.


This picture shows how I have put up the hardware in the racks with the bottom being the Frank Power bank and slowly moving up with the power amps and to the processor and finally the oppo player. The reason I arrange in this manner is that the player and processor are the one at a height easier for loading of disc and controls. The power amps before are just switch to turn on and nothing else. This will be convenient and nothing else. I choose not to have any door on it as it will be easier to access the hardwares. 


Both sides of the rack can has panels that is removable for easy maintenance as well. The railing and the trays are all adjustable as there are many holes provided for you to screw in as you wish. This is very useful as sometimes hardware has different sizes and you won't have to worry about not able to fit certain hardwares. 


Putting up all the hardwares are pretty much straight forward but the challenge is again what to do with the cables. This is the back of the racks where all the entanglement will start. From the overview, there are multiple cables going into the different amps and processors. 


The basic idea is to group all the cables accordingly as I have mine goes with different connections for the different channels. With this arrangement, it will be easier to keep it tidy and of course will be easier to look for which cables goes where. Cable ties definitely useful and don't go cheap on it. Tie as many as needed to keep everything group up.


This is another piece of good cable management for the rack, it is inserted vertical in the rack so cables and run through and goes to different level of the rack.


The cables are each tag on both ends so it will be easy for any future maintenance. 


There are some really long cables, like my HDMI cables which I have it tie to the rack on the side and some other long cables which can be 10 meters long.


This is one important component. The trunking that is at the side of the rack which have all the cables running in to the rack which can be put in properly. The holes along the trunking will allow cables to go to any part of the rack easily. Is the same as how electric wiring trunking in a typical home. 


Other than trunking will be this long stretch of power sockets or PDU (power distribution unit). This is very useful as there many hardwares in the rack and can be use and more importantly with this arrangement will be easier to manage the cables as well. 

One final thing which is essential will be lighting. As you can see in all the pictures above there are lights on different level of the rack. This will be very useful as room lighting is not enough with this kind of rack. Good lighting will be needed for any future maintenance. Hope this will be a good tips for anyone going to setup a home cinema. Enjoy the movies.


May 26, 2021

Upgrading My V! Kenwood GE-7030 Equaliser

With a pair of  Bose 901 MK VI speakers serving as the front main channels of  my 5.2.4 Dolby Atmos surround sound system, I have discovered that adding an EQ(in the form of a Pioneer GR-555) in to the mix only for the front channels improved the over sound performance of the system. What I did not realized is that  the quality of the EQ component mattered in HT too, just like in our 2 channel stereo system. Here goes......

The Kenwood GE-7030 comes with a frequency jog dial & level up/down buttons for easy band selection and adjustment. Excellent ergonomics when in use, even if all those buttons on the front face plate seemed a little daunting at first!

Spotted this unit on FB Market Place, made the inquiry, but due to it's high asking price I actually held back & thought carefully about it for more than a month if the more expensive EQ really makes a difference? I guess some times, what's meant to be was meant to be, as what are the chances that an item is still there after a whole long month or more? Based on my trading experience on FB Market Place, the stuff is usually gone after a few days if one is eyeing & not making an effort to secure the item.

Anyway, met the seller who was a really friendly guy and he gave me about an hour of his time, just walking me thru all the bells & whistles that this Kenwood GE-7030 has got. Basically, one can work this Kenwood EQ in 3 ways. First is the most common used as 14 band Graphic EQ. Next is as a 3/14 band grouped Parametric EQ. Last is the easiest, using it's 7 pre-programed stored EQ Genre curves, which includes modes such as Flat, Pop, Rock, Car, Jazz 1, Classical 1 or Classical 2. Last but not least, that matching pale bluish dot matrix text & bar display just matches my stack of other components from Denon, Cambridge Audio & Oppo. The Kenwood does not stick out like a sore thumb, unlike my earlier Pioneer GR-333 EQ which came with bright amber bar display. And believe it or not, the Kenwood GE-7030 was sold during the 1991-1992 catalog years. The fact that it's still around today is testament to Kenwood, and probably most Japanese audio manufacturers during the era, that overall high standard of build quality. The Kenwood also came in a tall, massive & deep 2U chassis, which on itself looks just like a second AVR on the rack, but weighting only 5.4kgs. Not too heavy, but for an EQ, it's a battle cruiser. 

My HT component stack. from top, Denon X-4400H AVR, Oppo UDP-203 & BDP-83 Blu-ray player, Cambridge Audio A-120 4 channel power amp, Kenwood GE-7030 EQ, and lastly Weiduka PLC and other auxiliary components, like HD Toaster & that Arcana HD Fury(hidden behind)

The Kenwood GE-7030 unit that I bought came with some minor scratches and dings on the front faceplate, which required some touching up with permanent black marker. Once marker ink dried, with a bit of elbow greasing, the touch up will look almost seem less, unless viewed up close  

With the Kenwood EQ plugged in to my AV system, allowing me to only manipulate the front channel tonal response, I played around with a variety of settings which included Parametric, Pre-Programed, but eventually  settled on that characteristic 14 band V setting on Graphic EQ mode which worked so well on Bose 901 speakers with the Pioneer EQ in use previously. With the EQ setting been custom set in memory, I can move on to enjoy my music & movies. Yes, I actually use the HT system on Denon HEOS to stream Spotify or just MP3 file loaded from my smart phone.

The first thing that hit me was how much more transparent sounding this Kenwood EQ is compared to the Pioneer EQ. It's not a fair competition either as the Kenwood is at least 2 steps up the model line, which equals to a Pioneer GR-777 in that case. However, the Kenwood EQ operates on all logic & memory control board while the Pioneer is still based on the classic electronic sliders. I am not sure if that's the advantage here, but the difference is easily heard, it's just so much more can be heard with the Kenwood, like a veil has been lifted off the sound track and music. The Kenwood is also more powerful sounding, the music & sound tracks just comes alive, as in gun shots, cannons and explosions hit harder, kick drums "kick" harder, and vocals, crystal clear and even with nice imaging thrown in when playing music in stereo mode! While vocals is crystal clear, it still maintains a degree of body within the image of the sound stage! Bass & treble definition is also improved  with the new clarity. Highs are more airy and bass lines can be followed easily. I can't say enough how well this Kenwood EQ matched the Bose 901 MK VI speakers. 

Just a caveat if you're reading this, it may not be a good idea to add an EQ in to the mix if you're not using Bose 901 series speakers in your stereo or HT system. The unique design and sound character of the Bose 901 series speakers demands that an EQ be used with it. There maybe other speaker designs with an EQ requirement, but I believe those are far & few in between, with the Bose 901 series being the poster boy of the group!  

May 9, 2021

Home Theater sound calibration

 Home Theater is pretty common this days in homes around the world. This can be as simple as 1 piece of sound bar to some pretty complicated multi channel surround sound. Mainly there are 2 main streams sound format, the DTS and Dolby. There are some other less popular like Auro 3D but is still about multi channel surround sound. With multiple sound mix created for movies over the years it has evolve quite far from the old days of 2 channel sound. The most common setup will be 5.1 or 7.1 although the current sound format do have multiple height or ceiling channels. Even with just 5 or 7 channels is still not that simple of getting the sound to be balance or be seamless. Many home users don't really understand on how the sound is mix or how it is intention for the listener. Challenges face by home users like example of vocal in movie is too soft, or sound effect is too much, or worst even lack of bass (LFE). I am one of those guy who faces this kind of challenges until I understand how important is for sound calibration to address those examples I have mention.


First thing when someone bought an AVR (Audio Video Receiver), looking at the manual is probably something scary. Sometimes just connecting up the cables is also a challenge. Of course, lets say you are connected up accordingly and you are ready to enjoy your movie. The next thing you notice is the sound doesn't quite right. Looking at AVR with tens of buttons and switches it can be rather overwhelming. Lucky thing is most AVR have something to help users out. It is the auto calibration function. Different company do it differently but the goal is the same, to get the sound to be right. In my case, I am using the Yamaha processor (CX-5200). This is not an AVR but a processor for the video and sound only. The main difference is the processor has no power output but AVR is all in one box. That is totally another different topic. Now in Yamaha's case it is the YPAO or like Pioneer will be MCACC or more exotic brand like Lyndoft or Arcam will be Dirac. Lets not get too far on that but each has its own way of doing the auto calibration. 


To start, auto calibration need to have some kind of instrument to do the measurement which feed information into the AVR or Processor to do the sound adjustment. There will be mic to use in case which will be provided by the manufacturer. Again different manufacturer do it differently but the basic concept is the same. Yamaha provided a 4 point stand together with the mic. The reason for this is to measure height speakers vs ground level speakers. In this picture, you can see that I have install the mic on a camera tripod. Is just makes it simple, of course can put it on anything you like. The key thing is the measurement should be at ear level on your seating position. The reason is pretty simple, you want the sound to go to your listening position on that specific height for your ear to get the sound correctly.


As the name suggest, auto calibration is pretty straight forward. Just connect the mic to the AVR than start to run the software. YPAO in this case for Yamaha which you can see on the pic. Is just something the YPAO to calibrate according to the speakers that is available. Instruction will be popping up according to the calibration as it run. Once the auto calibration is complete, it pretty much done and ready to rock and roll. 


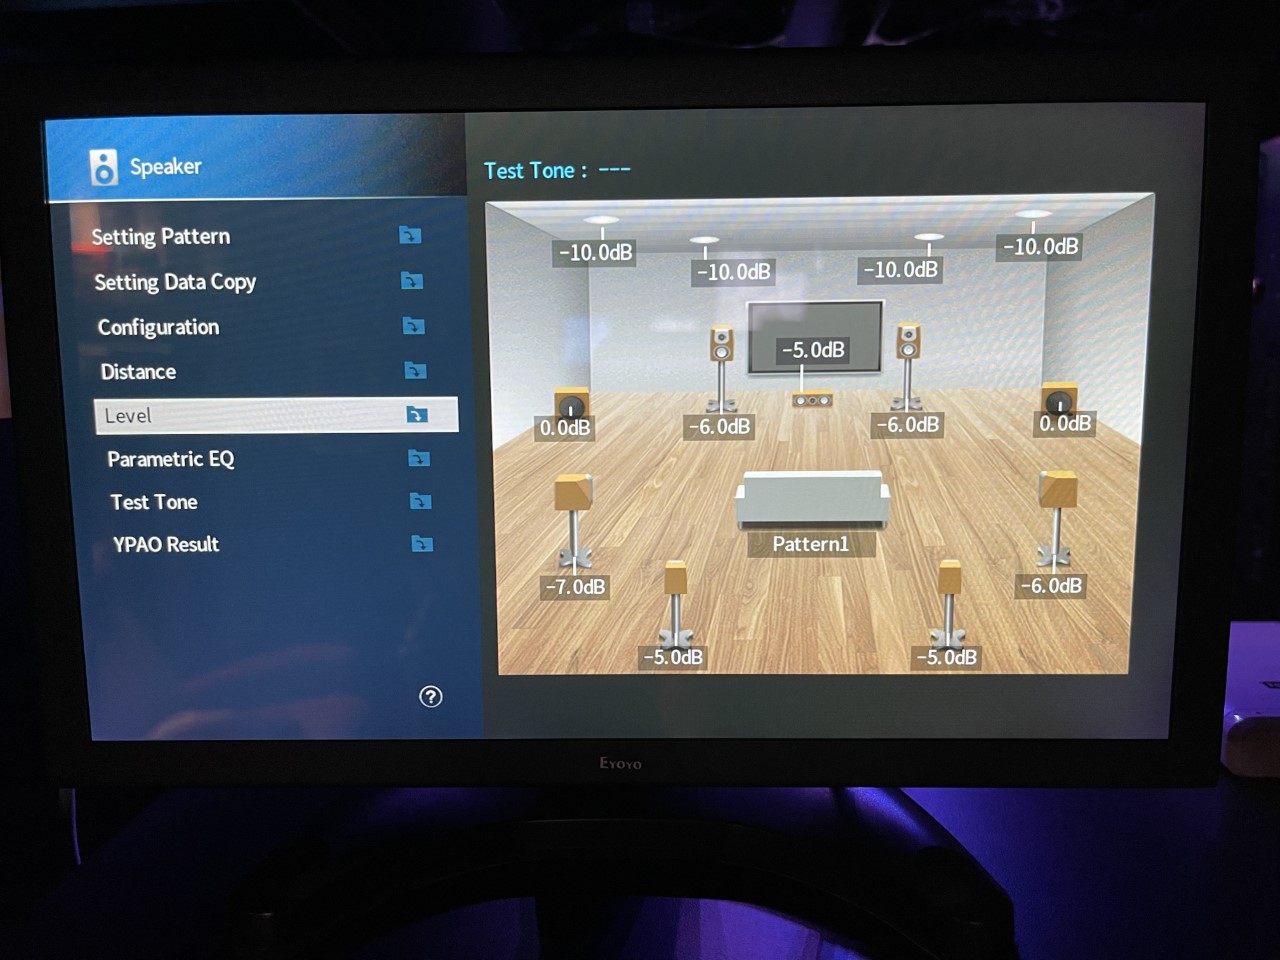
The additional step which I was to level the individual speaker or channel. As suggested by Dolby or DTS that the reference level should be abour 75 db for each individual channel. So here I use the Umik-1 mic with the REW software as SPL (Sound Pressure Level) meter. Even more simple is to use your smart phone and install the apps. The difference of this is the measuring mic which determine how accurate the sound level. 


This is the screen in the Yamaha to adjust the level according to the SPL reading to get to 75db. This is not a must but is good to do this. The important reason for doing is to ensure the sound is all even. Doesn't matter what is the speaker or size. It should be the same level so that the sound does not over power each other. This also apply for the subwoofer. After this is done, proceed to enjoy the show. 


May 6, 2021

Netflix here I come! Google Chromecast 3rd Gen

My kids have been subscribed to Netflix for a year or so, how ever so far they are only watching the programs on their smartphones. They made a request to Papa bear, so that they can watch Netflix content on the big screen, and what bigger than all of 120 inches of screen?

And off I went to KL's IT Centre, Plaza Low Yat for a solution. It was suggested that I need to get a Google Chromecast! And for MYR225/Unit, it was not too expensive either. Google Chromecast is a HDMI plug dongle that will go in to any of the HDMI ports of your TV and in my case AVR. I went home set up was indeed a breeze, as all I had to do was to plug in to an available HDMI port on my AVR, namely CBL/SAT. Connect the Dongle to the walwart power supply that came bundled in the package. My kids then went on to set it up with their smartphones. In 15 minutes or so we are watching movies on Netflix! 

Google Chromecast 3rd Gen


Set up was relatively straight forward, you basically follow the intuitive on screen instruction with a couple of "yes or no" choices and key in your wifi username & password, then TADAA! You've got Netflix, YouTube  and other contents on the net via your smartphone to your TV or AV system. One caveat though, you wifi signal needs to be strong in order for Chromecast to work. My AV room is located right at the corner towards the back of the house, so naturally wifi signal has diminished at this location. Hence another problem to be solved. I bought a TP Link AC 1750 wifi extender and problem fixed! 

This happens when wifi signal is weak

Watching Netflix or YouTube experience on the big screen depends very much on the file source available. On Netflix especially there some files source that is Full HD good and some at 720p. Streaming those 720p on my 120 inch screen looks pixelated and overall, not a good movies experience. Streaming Full HD with Dolby D+ as soundtrack, the movie experience comes close enough to BD level.

Now with Google Chromecast installed, family time during this MCO just got more intense, binge watching horror movies & series. The kids do love a good scare!   

April 29, 2021

Picture Quality Aspirations, Arcana HD Fury

Bothe ends of the Arcana HD Fury, which looks like a simple splitter in & out device with a nice fluorescent screen on which you do parameter settings to effect the picture & sound quality. The only thing I dislike about that display is that the text size use is too damn small!

I must say the promise was there when I heard my buddy told me that this little black box called Arcana HD Fury was capable of helping our Full HD projectors to cope with 4K movie source or at the very  least made them bearable. And so with such recommendation, I decided to get one. All you need is one extra HDMI cable for it to work, he said. Don't get those fancy cables, just the one that came with your Blu-ray player will be fine, he said.

I waited 2 weeks for my order to arrive my door step. Installation seems easy enough, plug the input HDMI cable from source(Oppo UDP-203), the output the HDMI cable to projector(Optoma UHD50). I ran the Arcana HD Fury in default mode, and at first play, a BD that I am very familiar with, Midway. WOW! I am impressed, the colors really "pop" out the screen with it's rich vivid tone, like I had just upgraded to a JVC projector or something! I thoroughly enjoyed Midway all over again. I was happy as a kite! 

The package that came, the Arcana HD Fury, and wallwart power supply & power cable which is optional, but I bought it for voltage combability assurance.

If these text pops out on the left bottom corner of the screen, means good, it works!

The happiness didn't last long unfortunately, the next moment I throw in a 4K disc of the same movie, and what greeted my was a red washed out screen! And so my trouble begins with the Arcana HD Fury! Another call to my buddy reveals that there compatibility issues between the Arcana HD Fury with certain brands of BD players, projectors or just HDMI cables. I must agree that it could not all Arcana's problem either, as from the very start, I felt the Optoma had rather weak connectivity to my Oppo BD player. I had tried many HDMI cables to get that connectivity to a reliable connectivity level. However even then, sometimes I still need to reset the projector or BD player or both to get them to work together.

I tried like about 5 different kinds of el cheapo or OEM bundle HDMI cables in order to try and make things work. Also tried various setting combos on the Arcana HD Fury, but none work! Certain setting you get that red washed out screen, and yellow or cyan washed out screen with other setting combos, or even pixelated black & white screen with other setting combos. There's a few parameters that one can set to try & make things work or make the picture quality better.

Regarding the setting parameters, you need to be very technically inclined to make it work! Otherwise, please just stay with default settings. 

This is what I got when it doesn't work, available not only in Red, but Cyan & Yellow as well depending on HDMI cable choice & parameter setting combo on the Arcana HD Fury! This happens when I used 4K movie source materials.

Now, when the Arcana HD Fury works, the picture quality is actually brought up a notch! This is with Full HD source material. Hacken Lee in concert!

Then one day, after more than 3 weeks working on making 4K movie files of BD work with the Arcana HD Fury, a slightly bright spark can in to my mind, to connect the Arcana between my Denon X-4400H AVR & the Optoma projector. Again lots of HDMI cable swap and parameter setting combos were made to make it work. Finally after fiddling for a week, I finally found a working combo using an old HDMI cable which was bundled with my Pioneer BDP-450 player and default settings on the Arcana.

With the 4K movie compatibility issue fixed, again I plomk in the same 4k Midway BD in to the system, and behold. There was some improvement compared to 4K movies running without the Arcana. As the beer budget Optoma doesn't throw enough light for 4K source materials, I almost always prefer to watch Full HD only BD or files. Using the Arcana in the AV system the improvements were slightly brighter picture, better contrast, and as result, make 4K source material that bit more bearable, especially in darks scenes where the Optoma projector naturally struggles the most. In dark scenes, the Optoma typically adds lots of visual noise to the 4K source material being played. The same 4K playback via the Arcana in the system gave less visual noise, making dark scenes that bit more bearable.

There was one draw back when using the Arcana in between the Denon & Optoma compared to Oppo direct to Optoma, leaving the Denon only for soundtrack duties. When used as such to make 4K source materials work, the Full HD experience suffers. When I say suffers, I mean in relation to picture quality attained as when used between Oppo & Optoma. You see, that vivid, rich popping color effect I got earlier is now being diluted. Having said that, the picture quality performance still got a small lift compared to as without Arcana in the loop.

With that, I settled down and just enjoy my movies as is. The entire Arcana HD Fury experience was NOT as positive as my buddies. I think it's because they all have JVC & Sony projectors. Me on the other hand, have 2nd rate Optoma. I read in many forums that the Arcana HD Fury doesn't work well with other 2nd rate brands such as BenQ, Epson or Vivitek either. Many feedback in those forums also commended the excellent consultative response from the Arcana people if you run in to issues as consumer. I did not contact them with my issues so I can't vouch for them. From my experience, the Arcana HD Fury is not something one buys on a whim like me. I paid steep price for it in terms of performance compromise & compatibility issues. All I am saying is do more research on the WWW before you commit to this product. I also feel that this product requires competent technical knowledge in regards to the parameter settings offered. It's not a plug & play product, and YMMV caveat certainly applies. 

I hope others will have better experience then me on this. 

February 27, 2021

Man cave diversity

After the completion of the room setup for home theater, I am pretty happy with the result and watching movie is never the same again. At the same time, other part of me getting itchy again. I was thinking now about what I can do more. During this time, I was experimenting of some DIY players which I wanted to use it for music playback. It has been a couple of years trying many different solution but don't really find something I like. Finally found this little box. Inside this plastic box is a single board computer from Asus (Tinkerboard). With this I am more enthusiast about now in music. The thing is I still need a DAC for this to work. 


I started hunting around to see what I can get. I had an old Arcam Irdac but doesn't support DSD. During this time, I was also looking for some other hardware to replaced my integrated amplifier. I guess is the timing or coincidence but I bump into Wadia DAC. Personally I only know Wadia by reputation of being the leader in DAC. I had an audition in Perfect Hifi on the Wadia hook up to the KEF REF3 speakers. Just simply listening to it already make me want to just swipe my credit card and take it home. That is exactly what I did. Now the Wadia 322di is seating in my room, LOVELY.......


At the same time I also picked up the Audio Research from Perfect Hifi. The pre-amp LS25 tube pre which is what I need as I need the function of HT bypass as it will be use together in the home theater setup. As I still needed a power amp to complete the setup and I gotten a use Audio Research REF110 from a friend of mine. Now it is a complete set. This stack of hardware is pretty much dedicated to hifi use. This is also the point of no return in getting myself into the rabbit hole of hifi world.


Personally I think I still need to get some basic right before going further into more hardware. Lets get the fundamental which is the power (electric) right. I came across Frank Power bank during KLAV and I decided to give it a try. Frank Voon is really a very nice guy to deal with and he came to install the power bank into my room. Now I don't just love my music but is totally awesome. 


Now I feel like this is maximizing the room and also the speakers. I totally never regret in getting into hifi. Although a very good friend of mine did poison me about it. During this meddling around with cables (speaker, interconnect, power), even changing all kind sockets, plugs. The speaker also had additional 2 inch white oak plinth under to get better stereo imaging. Many other voodoo as well as it goes. Well this is all the fun part of the hobby. Hope you guys enjoy it. 


February 21, 2021

Man cave construction & transformation

5 years later from the day I have my own dedicated man cave. Its time to go a little bit further. I had from my first experience in having a dedicated room was the fact that, plaster ceiling in the room is a big headache. The simple reason, is the LFE from the subwoofer is creating music on the ceiling. 😋 Its pretty annoying while you are so concentrated in the movie. Second lesson, is the power supply for the room is very important and is necessary to have enough of juice. 

So here we go with the start of the work by tearing everything down. Please pardon the toilet there. The original room was 13 feet x 17 feet. Is decent size but quite a bit tight in space. So the first thing is to get a bigger space. With the extension now the room is 17 feet x 20 feet. From the picture below, the red colour wall is where the projector screen going to be install.


This picture below is the back of the room. Had a small raise platform build up as I wanted to have 2 rows of seats. The raise floor is about 1 feet. Can't really do much as the height of the room is about 9.5 feet only. 


After the floor is taken care of, the next thing is the ceiling. Having plaster is simple and nice, however the rattling problem will still need to be address. How this is done instead of the usual aluminum frame use for conventional plaster ceiling, plywood is use instead to build the frame. In order to reduce vibration further is to fill it up with rockwool. The idea is to have weight on the plaster ceiling to help control the vibration. It cost a little more but I will say its worth the price for it. 


Speaker, power, HDMI cables are all lay in at the same time. There are 4 ceiling speakers and 4 surround speakers to be install later once is all done. 


So the basic of the room is taken of already. Next part is the electrical. I had wired the room with dedicated phase from my 3 phase electric for the room. This DB box is specially put in for the room. 
Each MCB is also direct to one power socket on the wall. 2 x of the MCB is specially direct to subwoofers. I had added many wall sockets in the room. The picture is one part of it. I just want to make sure I have enough even for future expansion.


The room is completed with wall papers and laminated wood flooring. Most of the equipment are from the existing with some additional add on. The first big thing that was the PB13. From the picture it can seen that its so much bigger compare to my tiny speaker. 


The front row seats with some recliners. It feels right during that time but soon I realized is a bad idea. Most of the time I will fall asleep on it rather finishing the movie 😆


The JVC projector is mounted  directly above the first row seat. The second row seat is 3 seater sofa. 
The roller blind is there because behind is glass wall blocks. 

First run of movie and its non other than Toy Story 3. 😊 Ever since this day, my children dominant the room more than me. 


Some movie posters just to have a bit more of cinema feel. 


Finally it is all done with the change of the room. That is all for now. This is the biggest work done for the room. Moving forward is pretty much changes of hardwares and some other minor decorative add on to the room. The room slowly do evolve a more into stereo listening as well rather than home theater which was the original purpose of the room. Will share more next week on the never ending journey.


February 13, 2021

Two in one system

Starting from the living room and moving into the dedicated room, the journey continues. All this while, I am doing the room for home theater purpose. Watching movie have never been the same again once you a have dedicated room. Although I had enjoy much of movies but something else crept up on my mind. What about stereo music ? The B&W speaker is really made for stereo and using it only for home theater is not fully utilizing it. Now having that in mind, I do something that is capable doing double duty. After doing some research and some consultation with friends, decided to get rid of the Emotiva processor and the power amp.


Looking from the pic above you can see that I had gone back to AVR from pre pro setup. This is the Yamaha A-3050 , the first Yamaha AVR that supports Dolby Atmos and DTS X. The model is from year 2015 and is the top of the line Yamaha AVR in that time. This is a 11.2 channel AVR. The price is very reasonable too, roughly about RM7,000. Keeping in mind that I wanted dual usage on my setup, I wanted Yamaha for the neutral sound. So this AVR will serve the purpose of surround sound and also pre amp on stereo.


Next up will be the new integrated amplifier which was highly recommended by a friend of mine. This is the Musical Paradise MP-501 integrated tube amp. It has 4 x KT150 power tubes which is capable of 65 watt in stereo mode. Coming from solid state amp into tube, it really makes me love music. The price for this nice amp is about RM6500, I guess is quite ok for this is a China brand. One of the important factor is that this integrated amp support HT bypass. With the HT bypass feature, with just a flip of a switch it can be an integrated amp or merely being a power amp only. This serve the purpose for me to be able to have pure 2 channel and also using it as power amp for the home theater. 


So now we have all the hardware for the audio, except that I still needed something to playback for my audio. This is the first time I have venture into digital audio playback. Had been reading quite a bit online on DAC. To be honest after much reading, I still don't quite know what is the DAC going to do for me. Nevertheless, I went to get this Arcam rDAC. A very simple dac with coaxial, USB and optical input with 1 pair of analogue output. It pretty much do 24/192 sampling. I simply hook up my Dell laptop to it play with foobar. All the files are loaded in external hard drive to be use. 


This is how the overall setup had changed into with the Yamaha, tube amp and the Arcam DAC. This is pretty decent given the fact that I have no idea what I was doing but just reading from internet. As a matter of fact, I had enjoy it very much. Hifi is really something far more complicated than home theater. Getting music nirvana is something I had invested a lot more than my home theater throughout the years. Till today, there are more things that I had wanted but still haven't get the chance to try it out. Hopefully this year will the the time to venture into analogue audio with vinyl record and turntable. Till that time comes, the journey continue.