Showing posts with label Room Acoustics. Show all posts

April 3, 2026

What a Difference a Year Makes – How A Mighty System got Mightier

Posted by Tan

I visited Mr. Soo’s system about a year ago—you can read about that visit here. Recently, I paid him another visit, after knowing that the system had undergone a major transformation. The changes were not limited to equipment; the room’s acoustic treatment also went through a major rework.

The front end is now driven by a Taiko Audio server, while amplification from CH Precision has been fully upgraded to flagship models. The setup includes the L10 preamplifier in mono configuration with separate power supplies, resulting in a stereo preamp housed in four chassis (two preamp units and two external power supplies). The power amplifier is the two-chassis M10, a stereo amp with external power supplies. The trusty Magico M6 speakers and the 2 JL Audio subwoofers remain in place.

CH Precision L10 preamplifier in mono configuration with separate power supply for each each channel

CH Precision M10 power amplifier with separate power supply

Taiko Audio and TotalDac digitial frontend

Equally significant was the overhaul of the room acoustics. The ceiling and walls are now fully treated with diffusers and absorbers, and Mr. Soo told me rockwool has also been added to the cavity between the ceiling and roof.


Diffusers and absorbers on the ceiling

The impact of these treatments was immediately noticeable. The acoustic environment had improved significantly—I found that having a conversation in the room was easy and natural, among the best I’ve ever experienced. We could speak at normal volume without straining to hear, and every syllable was clear, free from smearing or disturbance.

Performance-wise, the system had advanced a few notches. Dynamics were more expressive, giving the sound a muscular, impactful character. At the same time, the refinement I admired during my last visit was not only preserved but enhanced—the sweetness and smoothness in the highs were a particular highlight. Overall clarity and background quietness were exceptional, no doubt aided by the successful acoustic treatments.

Mr. Soo’s approach to bass management with the Magico M6 and JL Audio subwoofers (as described in my previous report, where he used an active crossover to send bass to the subs and mids/highs to the main speakers) continued to deliver excellent results. There was no hint of bass boom; instead, the low frequencies were supple and seamlessly integrated with the mains. It was impossible to tell where the Magico ended and the JL Audio took over, very well done indeed.

As for what comes next, I’m not sure how Mr. Soo will push his system further. But our hobby is about pushing the boundaries, so, who know, my next visit may reveal yet another big leap forward!

February 7, 2026

ACOUSTIC SOLUTIONS Solves Bass Problems

 Posted by Tan    

Any audiophile who had spent enough time in this hobby would realize that room acoustic is that one factor that can make or break the performance of your HiFi system, regardless of how high-end your system may be. It thus makes sense for us to put in effort to solve our room issues, rather than to get on a never-ending equipment upgrade spiral.

Among the many possible room acoustic issues, the one most affecting listening pleasure is bass boom. That is when bass energy reflected from the walls causes the bass region to be excessively boosted and to also linger too long in the room after the music has passed. The effect is not only muddied and ill-defined bass but it may also affect the overall clarity in the midrange and highs, music just turns to mush.

Bass boom is a most difficult acoustic problem to solve. As bass frequencies have very long wavelength, their travel is hardly affected by small objects, such as those we use for tweaking. Therefore, as we always see, in-room bass treatment solutions are necessarily and invariably big and bulky (here, I mean passive treatment solutions. There are also active treatment solutions which is of the size of a bookshelf speaker for example, and there is also the DSP way, but those are discussion for a different day).

Comes an audiophile friend of mine, Mr. Beh. Bothered by bass issue in his own listening room, Mr. Beh did his research and built his own bass treatment solution based on a public domain BBC research paper. He called his creation Acoustic Solutions membrane resonator. On the outside, it looks like a rectangular wooden box measuring 2ft x 2ft x 7in (58 x 58 x 18cm), the inside is partially stuffed with absorptive material, it is said to be most effective at treating room mode in the 50-150Hz range.

The resonator is to be placed at the walls where the bass energy is the strongest (which will require the owner to do some experimentation to find the best spots), with the front of the resonator (i.e., the membrane panel) facing out. Multiple units are usually required to achieve the best results.

I joined a room treatment session where Mr. Beh used his resonators to treat the room. His approach was not just subjective listening but also rooted in objective measurement. At the beginning of the session, he used the REW acoustic measuring software to identify the acoustic behavior of the room, and pinpointing the problematic bass frequency ranges. Then, the resonators were placed at strategic places (corners, middle of wall, single box or multiple boxes stacked), then room measurement was done again. The process was repeated multiple times to ensure that the greatest effect was achieved.

We could see that on the measurement graph the RT60 (reverb time taken for sound to attenuate 60dB) was reduced by more than half from 1sec to 300-400 ms, the bass peak at 60+Hz on the frequency response curve was also cut down, meaning that bass would now sound tighter and cleaner, an excellent outcome.

We confirmed in our subsequent listening session that bass notes indeed were better defined, and bass response sounded more linear, which also improved the overall clarity of the sound. The one not-quite-expected effect for me was that I found listening now was more comfortable, less fatiguing, maybe it was due to my brain not having to compensate for the disturbances in the bass region, regardless of how subtle or prominent they were. A quick experimentation in my own room also revealed that the resonator could add some richness to the mid, and round out and smoothen the highs a bit.

The following photos show the use of the Acoustic Solutions resonators in Mr. Beh's own listening room: 


Further details on the design and use of the resonators:


If you are bothered by bass issue in your listening room, and you are uncertain about the efficacy of room treatment products in the current marketplace, consider a Malaysian home-grown approach then. Who knows, may be Mr. Beh would be happy to visit you and help you with finding the solution. He has helped quite a number of his audiophile buddies solve their headache already.

List price RM980/pc. Special introductory price RM800/pc for a limited period. Contact Mr. Beh Thuan Wei +6012-5222453. 

June 1, 2021

Bass Tuning! Bose Acoustimas Series Woofers

Dr Amar G Bose started his career as a Professor in MIT. Later he would start the Bose Corporation by licensing his amplification algorithm for American military use & the likes of NASA. It was much later that consumer products like the Bose 901 series speakers hit the market. The 901 series speakers was a polarizing product as people in general either loved or hated it. The Bose 901 series speakers does hold some scientific promise, but was the result reflective of those published scientific papers? That's what makes it so polarizing.

Many years later, Bose moved away from conventional box speaker products and started moving in to the Acoustimass series of satellite speaker with sub woofer combo. Still very based upon the earliest premise of Direct/Reflect Sound Technology, but also add to the premise that low frequencies, a.k.a. bass becomes omni-direction below 80Hz. This comes at a time when urban living became more dense, homes got smaller, but people still wanted good sound with room filling bass. And judging by the Accoustmass series sales numbers, it was a home run!

Now, I know many audiophiles have some kinda beef with Bose, due to the construction & materials used, and that smoothing, well rounded, limited bandwidth sound ani't what we call hifi either. However, to the other 98% of the world population, that didn't really matter at all, despite those high price tags which resulted in fat margins. Fast forward to recent years, Dr Amar G Bose wanted to cash out, hence sold Bose Corporation to Apple Inc. Apple already own Beats By Dr Dre. And now Apple have merged both entities to become Beats By Bose!

I started with a little history & background of Bose, because I am squarely in the 2% of the worlds audiophile population, yet I am one of the few who loves Bose products for what they are today, lifestyle. My household is just all Bose sound mostly, in the non audiophile areas. And lastly, I find the Acoustimass bass modules, or woofers just so useful to have around, especially the passive ones. they are easy to integrate in to any existing sound system, and with guarantee extra room filling bass. What else do you want? Me, I always find the Acoustimass modules bass to be a little flabby, and when playing loud, port chuff becomes very apparent, especially the older series 1 models. Which is what I have exactly in my home office/study area.

And here, I set about doing something about that port chuffing sound. This DIY work is rather easy, and I think every Bose Acoustimass woofer user should try it. Do you know you can tone down that flabby bass & port chuff sound by just stuffing the Bose Acoustimass woofer? Here's a step by step guide how to do it. 


Bose Acoustimass series I bass module.

Once turn around, you will find back panel access screws & speaker input & output connectors.

You'll need to unscrew all the screws on the back panel, including those holding the 4 feet.  Do not unscrew the speaker terminal screws.

The back panel open, revealing all the internals inside, you will notice there is already some poly fill inside. Those white fluffy pillow fill. Just look at the materials used by Bose, woodchip board, crappy looking Pasar Road drivers & cheap x-over parts. Nothing special, but industrial grade only.

A closer look at the cross-over, all stuck to the rear panel.

Add more polyfill or pillow fill, there are generally 3 types on window fill, you can have foam or feather, both sadly are no good for this application. Then you have polyfill of various density, which will work for this case. What I have is of rather high density polyfill.

After filling the accessible side of the box to about 70% including the original polyfill. I stop and work on closing back the rear panel, making sure all the wires are still connected and in contact. As it quite common for Bose Acoustimas bass modules to fray & delaminate around the edges & corners of the box, so I wrap my module corner & edges with black duct tape to keep it protected. Even if the Acoustimass bass modules are designed to lie down, they can be placed in various positions, those liitel red feet you see are actually rubber door stoppers available from your local hardware shop. 


The bass quality after stuffing of polyfill in to the Bose Acoustimas bass module is tighter, cleaner and certainly less bass port chuffing effect. The immediate feeling is that the upper bass has been toned down, with slightly less kick and an overall bass volume reduction. So in essence, you gain some and you lose some. but for me it certainly an easy mod that takes just 20 minutes or so and it work a joy. Here are some other Bose Acoustimas bass modules that have gone thru similar bass tuning process.


Bose Acoustimass series III, I use this to complement the main hifi rig in my man cave. I loev this passive sub because even though it's one box, there is actually 2 units of  6.5 inch drivers inside running in stereo configuration! 

Here is how the Bose Acoustimas series III looks inside, still 2 units 6.5 inch drivers inside working as stereo pair. The box chamber design is totally different, but you can still access the box via the back panel where the speaker connectors are located. With simplified construction, all you need to do is to uncrew 6 screws in back panel to be accessible to the chamber which I have circled in RED. You just need to stuff the polyfill in to the chamber(as circled in RED) by 30-50% for bass tuning, results depends on your preference & room acoustics interaction.

I not only use Bose in my home, but also inside my car too. I use this Bose Acoustimass Canon in my car boot to augment bass to the OEM system in my car. I also need a 2 channel amp to drive this too. Again my main issue here is port chuffing & car interior panel vibration.

There are 3 chambers inside the bass canon. You can stuff polyfill in to the center chamber as circled in RED by 50-70%. As I preferred tight bass in my car, I filled the middle chamber by up to 70%. The chamber is accesi8ble via the tuning ports with end caps on the long port side. You just need to unscrew all the screws around the tube diameter on the end cap. For my interior panel vibrations, I added sound dampening materials to them. With panel vibration gone and bass tuning to very tight less, I some times can sit in my car, after reaching the destination. just to finish the song, before getting out!  

Bose Acoustimass Canon for home theater use. No I don't have this, but one of my buddies used to have it in his HT den, back then in the 1990's. These Bose Acoustimass Canons were considered high end at the time! I remembered my friend demo-ing Top Gun movies in his Dolby Digital 5.1 HT system. They were pretty convincing back then. However, the Bose Acoustimass Canon is very rare now, and hard to find in the used market.

There you go, now you know my fetish for Bose Acoustimass bass module!


May 9, 2021

Home Theater sound calibration

 Home Theater is pretty common this days in homes around the world. This can be as simple as 1 piece of sound bar to some pretty complicated multi channel surround sound. Mainly there are 2 main streams sound format, the DTS and Dolby. There are some other less popular like Auro 3D but is still about multi channel surround sound. With multiple sound mix created for movies over the years it has evolve quite far from the old days of 2 channel sound. The most common setup will be 5.1 or 7.1 although the current sound format do have multiple height or ceiling channels. Even with just 5 or 7 channels is still not that simple of getting the sound to be balance or be seamless. Many home users don't really understand on how the sound is mix or how it is intention for the listener. Challenges face by home users like example of vocal in movie is too soft, or sound effect is too much, or worst even lack of bass (LFE). I am one of those guy who faces this kind of challenges until I understand how important is for sound calibration to address those examples I have mention.


First thing when someone bought an AVR (Audio Video Receiver), looking at the manual is probably something scary. Sometimes just connecting up the cables is also a challenge. Of course, lets say you are connected up accordingly and you are ready to enjoy your movie. The next thing you notice is the sound doesn't quite right. Looking at AVR with tens of buttons and switches it can be rather overwhelming. Lucky thing is most AVR have something to help users out. It is the auto calibration function. Different company do it differently but the goal is the same, to get the sound to be right. In my case, I am using the Yamaha processor (CX-5200). This is not an AVR but a processor for the video and sound only. The main difference is the processor has no power output but AVR is all in one box. That is totally another different topic. Now in Yamaha's case it is the YPAO or like Pioneer will be MCACC or more exotic brand like Lyndoft or Arcam will be Dirac. Lets not get too far on that but each has its own way of doing the auto calibration. 


To start, auto calibration need to have some kind of instrument to do the measurement which feed information into the AVR or Processor to do the sound adjustment. There will be mic to use in case which will be provided by the manufacturer. Again different manufacturer do it differently but the basic concept is the same. Yamaha provided a 4 point stand together with the mic. The reason for this is to measure height speakers vs ground level speakers. In this picture, you can see that I have install the mic on a camera tripod. Is just makes it simple, of course can put it on anything you like. The key thing is the measurement should be at ear level on your seating position. The reason is pretty simple, you want the sound to go to your listening position on that specific height for your ear to get the sound correctly.


As the name suggest, auto calibration is pretty straight forward. Just connect the mic to the AVR than start to run the software. YPAO in this case for Yamaha which you can see on the pic. Is just something the YPAO to calibrate according to the speakers that is available. Instruction will be popping up according to the calibration as it run. Once the auto calibration is complete, it pretty much done and ready to rock and roll. 


The additional step which I was to level the individual speaker or channel. As suggested by Dolby or DTS that the reference level should be abour 75 db for each individual channel. So here I use the Umik-1 mic with the REW software as SPL (Sound Pressure Level) meter. Even more simple is to use your smart phone and install the apps. The difference of this is the measuring mic which determine how accurate the sound level. 


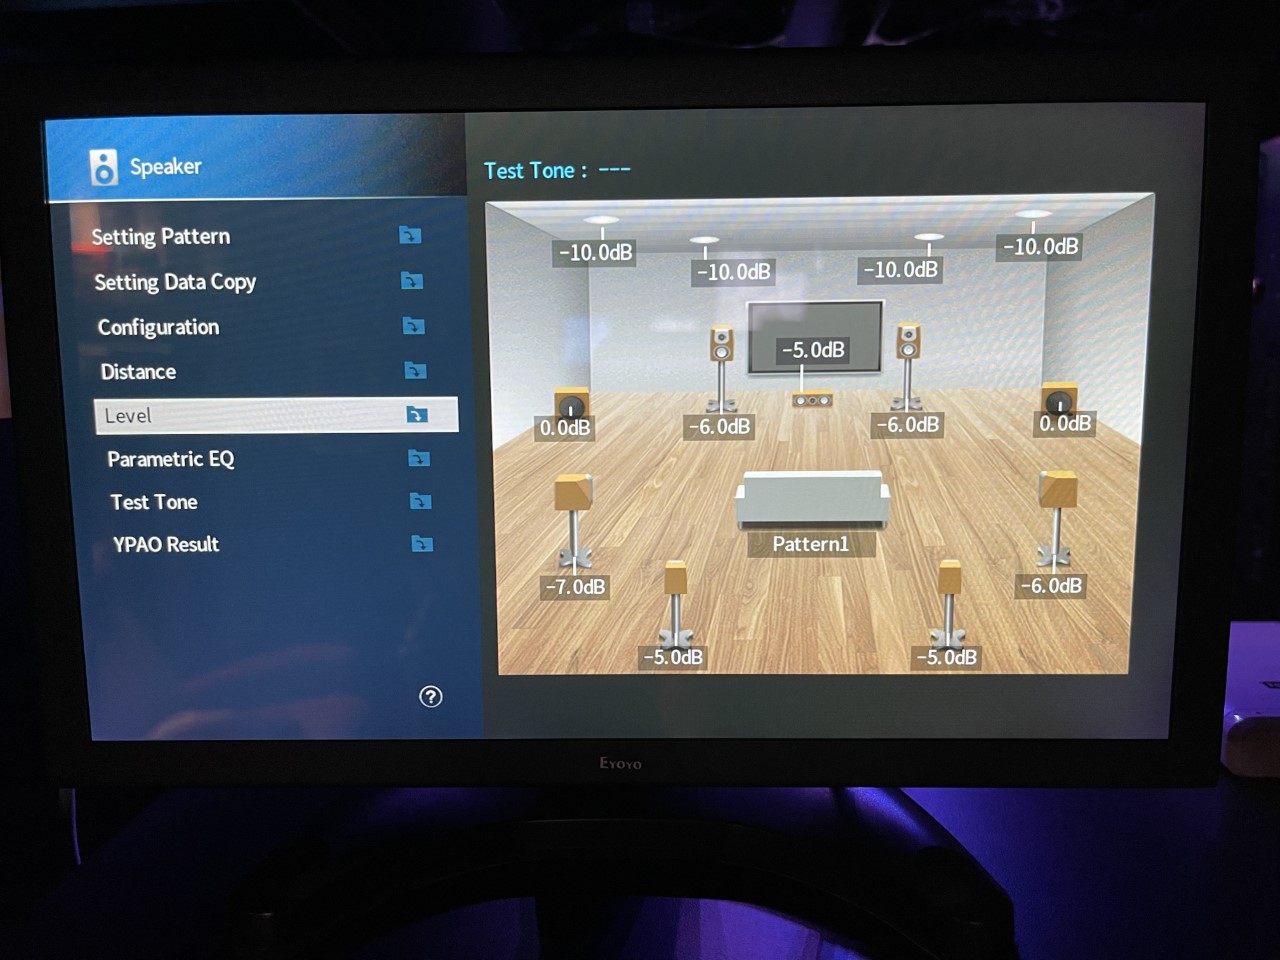
This is the screen in the Yamaha to adjust the level according to the SPL reading to get to 75db. This is not a must but is good to do this. The important reason for doing is to ensure the sound is all even. Doesn't matter what is the speaker or size. It should be the same level so that the sound does not over power each other. This also apply for the subwoofer. After this is done, proceed to enjoy the show. 


February 21, 2021

Man cave construction & transformation

5 years later from the day I have my own dedicated man cave. Its time to go a little bit further. I had from my first experience in having a dedicated room was the fact that, plaster ceiling in the room is a big headache. The simple reason, is the LFE from the subwoofer is creating music on the ceiling. 😋 Its pretty annoying while you are so concentrated in the movie. Second lesson, is the power supply for the room is very important and is necessary to have enough of juice. 

So here we go with the start of the work by tearing everything down. Please pardon the toilet there. The original room was 13 feet x 17 feet. Is decent size but quite a bit tight in space. So the first thing is to get a bigger space. With the extension now the room is 17 feet x 20 feet. From the picture below, the red colour wall is where the projector screen going to be install.


This picture below is the back of the room. Had a small raise platform build up as I wanted to have 2 rows of seats. The raise floor is about 1 feet. Can't really do much as the height of the room is about 9.5 feet only. 


After the floor is taken care of, the next thing is the ceiling. Having plaster is simple and nice, however the rattling problem will still need to be address. How this is done instead of the usual aluminum frame use for conventional plaster ceiling, plywood is use instead to build the frame. In order to reduce vibration further is to fill it up with rockwool. The idea is to have weight on the plaster ceiling to help control the vibration. It cost a little more but I will say its worth the price for it. 


Speaker, power, HDMI cables are all lay in at the same time. There are 4 ceiling speakers and 4 surround speakers to be install later once is all done. 


So the basic of the room is taken of already. Next part is the electrical. I had wired the room with dedicated phase from my 3 phase electric for the room. This DB box is specially put in for the room. 
Each MCB is also direct to one power socket on the wall. 2 x of the MCB is specially direct to subwoofers. I had added many wall sockets in the room. The picture is one part of it. I just want to make sure I have enough even for future expansion.


The room is completed with wall papers and laminated wood flooring. Most of the equipment are from the existing with some additional add on. The first big thing that was the PB13. From the picture it can seen that its so much bigger compare to my tiny speaker. 


The front row seats with some recliners. It feels right during that time but soon I realized is a bad idea. Most of the time I will fall asleep on it rather finishing the movie 😆


The JVC projector is mounted  directly above the first row seat. The second row seat is 3 seater sofa. 
The roller blind is there because behind is glass wall blocks. 

First run of movie and its non other than Toy Story 3. 😊 Ever since this day, my children dominant the room more than me. 


Some movie posters just to have a bit more of cinema feel. 


Finally it is all done with the change of the room. That is all for now. This is the biggest work done for the room. Moving forward is pretty much changes of hardwares and some other minor decorative add on to the room. The room slowly do evolve a more into stereo listening as well rather than home theater which was the original purpose of the room. Will share more next week on the never ending journey.


November 16, 2020

The Results, My Home Theater

Continuing from my last posting about my HT room project. I have allocated a room measuring 17ft x 13ft x 11ft(W x L x H). My projection screen mounted on the 17ft wall which leaves me the 13ft total projection length. The final outcome is that 11ft projection length(measured from tip of lens) was used as projection length for the Optoma UHD 50 projector to project 120 inch screen size(measured diagionaly as in TVs)  

The 120 inch XY screen dominates the 17ft wide wall. Also noted is a pair of SVS PB-2000 sub woofers, flanked by a pair of Bose 901 MK VI series main speakers partnered with a single Bose 201 MK III as center channel.

Form the next picture below, you can see that my sofa is backed up against the back wall still measuring 17ft wide, but with space taken up entry door on the left, and equipment rack & disc library on the right. Overall, this is a SIM 4K picture quality & Dolby Atmos 5.2.4 sound specification based system. And if you look carefully, you won't see much cabling, as most are either imbedded in wall or in ceiling. All the cabling was laid when I planned my HT room project during my home renovation in 2018.


You can also see that the Optoma UHD 50 projector is mounted right above the sweet spot of the sofa! Flanking the projector is a pair of Bose 101 surround speakers. If you look carefully on the right, next to my equipment rack, is the Bose Acoustimas 5 passive sub woofer, which is set to high pass at 80Hz as part of the rear surround system. 

My equipment rack from top: Denon AVR X-4400 H receiver for Dolby Atmos & DTS-X processiong & powering center channel & 2 pairs Dolby Atmos ceiling speakers which are Bose Model 25, Oppo UDP-203 4K disc player with the Oppo BDP-95 Full HD player with Cinivia free. Further below is the Cambridge Audio A120 4 channel power amp, powering front main speakers & surround sound duties. Further below is the Weiduke AC 8.8 power conditioner which powers the whole stack of equipment as seen and my dual HDD toaster for my 4K movie collections. 

On the right side corner of the back wall, is a compartmentalized area, mainly for library of disc collection. I also installed a dedicated MCB box in my HT room. If the book shelves looked familiar, is because they are from Ikea!

I also did some acoustic diffuser works on the ceiling to break up sound waves, coupled to heavy drape curtains on both sides of the side wall upon the first reflection points of the Bose 901 MK VI main speakers. The ceiling acoustic diffuser also works as the mood light & 2 pairs Dolby Atmos ceiling speaker mounts, if you look carefully.  

Overall for the money I spent, at about MYR25,000 on all equipment count, I feel satisfied with the intangible return on entertainment values, especially these days of MCO where the cinemas are closed. The 120 inch screen give big picture cinema feel when just sitting about 13ft away. When viewing Full HD movies, the picture is bright, vivid tonal pallet and very punchy, if some what veering slightly bluish(like most Sony or Samsung TVs factory calibration). Upon having sifu Michael Wong(contacted via FB) coming over to help calibrate my projector, the picture quality improved in terms of field of depth layering of majestic scenes from movies. Since the Optoma UHD 50 is a SIM 4K(i.e. non native or up sampling to 4K), the picture quality in 4K post calibration took a turn for darker and being a budget projector, the blackness(or greyish black) weakness is laid bare and exposed for all to see too clearly. Movies like Batman's The Dark Night should be avoided in 4K mode, due to the projector limitations. Bottom line is if you're expecting JVC level of 4K reproduction here, you'll be sorely disappointed. However if you are like me, where my majority of movies are on Full HD, with only the occasional 4K viewing diet, then this projector will get the job done very well.

The sound is an area I am more than happy with. I run the Denon Audyssey Auto  Calibration with the supplied OEM mike and already gor very decent results. I then further fine tune the channel levels, the high pass frequencies for speaker and low pass for LFE, and timing compensation with EQ off. It was just some tuning from disc to disc over time and until a point, I never need to fine tune the Dolby Atmos settings again, until I changed something that is.

The sound is with effective in surround panning, & the Atmos ceiling speakers are especially effective when watching raining or thunderstorm or aircraft scenes, especially is movies like Top Gun & Mid Way, just to recall the 2 movies that impressed me. The dual SVS sub configuration gives thundering bass and full on explosion impacts, to the point that is room and plaster ceiling shaking! I love using Bose speakers all round for HT because they are really good value at used prices and they can really go loud without popping their drivers! They are also very warm sounding for music concerts, and especially enjoyable when playing those Vienna Philharmonic New Years Concerts! 

I have made some improvements along the way since system installation over a year ago, and I'll get to those later. What do you think? Kindly feedback on comments section with thanks if any opinion or questions............

August 30, 2011

Wedging Wall. Auralex Studiofoam Wedges.

After listening to my system, a senior audiophile of "sifu" status told me that I should consider re-doing rear wall treatment, consisting of commercial acoustic foam panels and Auralex MetroFusor diffusor panels. His comment was that my back wall didn't seem to disappear enough, i.e. there's still some 2nd or 3rd deflection points, reducing the imaging stability("tein wai" in Cantonese speak) of my sound stage!

He reckons that I should just get rid of all my diffuser panels and just use Auralex Studiofoam Wedges all over instead. I headed to Centre Circle Audio the very next day and came home with 2 pieces of 2 x 4 ft Studiofoam Wedges. I went straight ahead and ripped out all my previous panels in the rear wall and proceeded to trial the Auralex Wedges panels. I stuck them to my rear wall with temporary mounting tapes and had the 2 x 4 ft panels on the horizontal side by side, to form a 2 x 8 ft black panel right behind my listening throne(sofa).

Auralex Studiofoam Wedges.

I proceeded to play some music and noted a much more silent, blacker back ground within the sound stage. However, I also noted that my high frequencies were rolled off a whole lot more than I liked too, seemingly absorbed by the Wedges. Music was lifeless, dull and boring! I guess I had overdone the Wedges panels.

Next I used only one piece of the 2 x 4 ft Wedges panel, I stuck it right in the middle of the wall, right behind the listening throne, where my head would be if I were seated, then proceeded to introduced back the Auralex MetroFusor diffusor panels measuring 2 x 2 ft  at both ends of the Wedges panel. See picture below for the final configuration.


My final back wall treatment configuration Auralex MetroFusor-Auralex Studiofoam Wedges-Auralex MetroFusor.
 I proceeded to play music again, and this time it's bliss! I managed to get the silent, black back ground for stronger imaging properties within the sound stage, and yet, did not have to suffer much rolled off high frequencies. A bonus was that because of the improved staging stability, I could also perceive deeper in to the layers of the sound stage, something of a weakness in my system previously. I did not lose any musicality, or rhythm and pace as experience just before. I listened for a few more days, and well convinced about the improvements I heard with various recordings, I applied the wall adhesives to the Auralex panels and made this my permanent back wall treatment. By the way, in case you're wondering, a piece of 2 x 4 ft Auralex Studiofoam Wedges cost RM$190.00, small money for great results(for me at least)!

In case you're wondering if you should do the same, I can only say that you should at least give it a try!

Auralex Acoustics is sold by Centre Circle Audio, contact Sky, or Nelson at 03-77282686.