Showing posts with label Home Theater. Show all posts

May 13, 2021

Bass Matters! Bass Management/Calibration

Its has been ages since anyone posted on bass management. Last week I have talk about doing auto calibration or calibration for your multi channel audio. This is something tedious and time consuming. I think to some can be mind boggling. It is how I started as well but I am lucky to be guided by some of the best sifu there is. Another lucky thing is many forum members willingness to share on their experience especially the mistake learn which helps a ton to me.


First thing I learn about management is the essential tool. The more common tool most members are using is the REW software with the Umik-1 mic. There are tons of better products out there but that is another topic. REW is a measurement tool of how the sound respond. The purpose of it, is to know what might be dip and peak of different frequency. Knowing that will tell us what we want to focus in getting it to the more ideal level. Looking at the graph I have posted is the respond of my dual subs to my room. You can see that is all the bumps and dip still even after much work was done in correcting it.  


REW or (Room EQ Wizard) is the software use for measuring audio. It can be downloaded from https://www.roomeqwizard.com/ as it is a freeware. This can be use as SPL meter to measure how loud the sound which is very useful when doing leveling on multichannel audio. Of course to use the software you need the hardware for the measurement. That is the umik-1 from the company (MiniDSP). Its a Hong Kong based company that produces hardware of various kind of audio management. Its sold for USD79 which can be bought here https://www.minidsp.com/products/acoustic-measurement/umik-1


With this hardware and software is pretty much you can start doing the calibration work on your audio. This also applies for stereo or any number of channels. The limitation right now is the REW software ability to measure height speakers. Of course you can always rely on the software in your processor to do that as well. Some pictures here just to show some example of measurement I have done for my home theater setup. You can see the graph with multiple measurements for different channels. The other graph with just 1 line is the subwoofer measurement.


One additional tool which I have in place is the minidsp 2x4 HD. What it means 2x4 as it have 2 inputs and 4 outputs. This is use for subwoofers to manage the bass which will help on top of the processor calibration. The minidsp has more functions which can do tons in calibrating the LFE (Low Frequency Effect) or bass in your home theater setup. The beauty of this hardware, it works with the REW software. Practically the measurement done in REW can be imported into the minidsp to save some work on your calibration.


This is the result I have gotten so far for my dual SVS subs which consists of SB16 and PB16. Its a mix of sealed and ported subs in my setup which I think is best of both worlds. This is not quite popular I will say as integrating both subs can be a big challenge. Get it right and is very satisfying. Time to get back to more movies. Cheers......


May 9, 2021

Home Theater sound calibration

 Home Theater is pretty common this days in homes around the world. This can be as simple as 1 piece of sound bar to some pretty complicated multi channel surround sound. Mainly there are 2 main streams sound format, the DTS and Dolby. There are some other less popular like Auro 3D but is still about multi channel surround sound. With multiple sound mix created for movies over the years it has evolve quite far from the old days of 2 channel sound. The most common setup will be 5.1 or 7.1 although the current sound format do have multiple height or ceiling channels. Even with just 5 or 7 channels is still not that simple of getting the sound to be balance or be seamless. Many home users don't really understand on how the sound is mix or how it is intention for the listener. Challenges face by home users like example of vocal in movie is too soft, or sound effect is too much, or worst even lack of bass (LFE). I am one of those guy who faces this kind of challenges until I understand how important is for sound calibration to address those examples I have mention.


First thing when someone bought an AVR (Audio Video Receiver), looking at the manual is probably something scary. Sometimes just connecting up the cables is also a challenge. Of course, lets say you are connected up accordingly and you are ready to enjoy your movie. The next thing you notice is the sound doesn't quite right. Looking at AVR with tens of buttons and switches it can be rather overwhelming. Lucky thing is most AVR have something to help users out. It is the auto calibration function. Different company do it differently but the goal is the same, to get the sound to be right. In my case, I am using the Yamaha processor (CX-5200). This is not an AVR but a processor for the video and sound only. The main difference is the processor has no power output but AVR is all in one box. That is totally another different topic. Now in Yamaha's case it is the YPAO or like Pioneer will be MCACC or more exotic brand like Lyndoft or Arcam will be Dirac. Lets not get too far on that but each has its own way of doing the auto calibration. 


To start, auto calibration need to have some kind of instrument to do the measurement which feed information into the AVR or Processor to do the sound adjustment. There will be mic to use in case which will be provided by the manufacturer. Again different manufacturer do it differently but the basic concept is the same. Yamaha provided a 4 point stand together with the mic. The reason for this is to measure height speakers vs ground level speakers. In this picture, you can see that I have install the mic on a camera tripod. Is just makes it simple, of course can put it on anything you like. The key thing is the measurement should be at ear level on your seating position. The reason is pretty simple, you want the sound to go to your listening position on that specific height for your ear to get the sound correctly.


As the name suggest, auto calibration is pretty straight forward. Just connect the mic to the AVR than start to run the software. YPAO in this case for Yamaha which you can see on the pic. Is just something the YPAO to calibrate according to the speakers that is available. Instruction will be popping up according to the calibration as it run. Once the auto calibration is complete, it pretty much done and ready to rock and roll. 


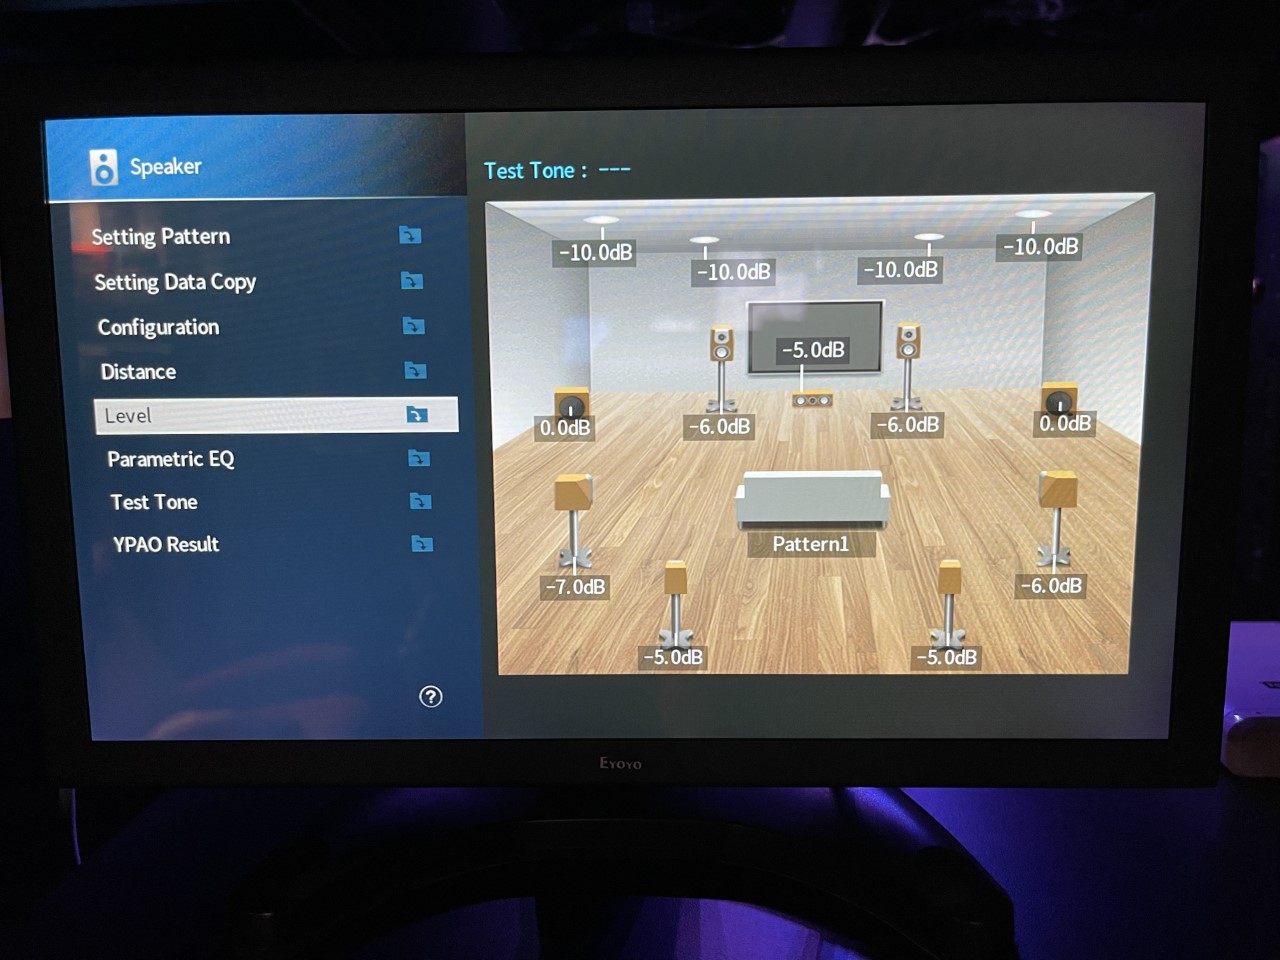
The additional step which I was to level the individual speaker or channel. As suggested by Dolby or DTS that the reference level should be abour 75 db for each individual channel. So here I use the Umik-1 mic with the REW software as SPL (Sound Pressure Level) meter. Even more simple is to use your smart phone and install the apps. The difference of this is the measuring mic which determine how accurate the sound level. 


This is the screen in the Yamaha to adjust the level according to the SPL reading to get to 75db. This is not a must but is good to do this. The important reason for doing is to ensure the sound is all even. Doesn't matter what is the speaker or size. It should be the same level so that the sound does not over power each other. This also apply for the subwoofer. After this is done, proceed to enjoy the show. 


February 21, 2021

Man cave construction & transformation

5 years later from the day I have my own dedicated man cave. Its time to go a little bit further. I had from my first experience in having a dedicated room was the fact that, plaster ceiling in the room is a big headache. The simple reason, is the LFE from the subwoofer is creating music on the ceiling. 😋 Its pretty annoying while you are so concentrated in the movie. Second lesson, is the power supply for the room is very important and is necessary to have enough of juice. 

So here we go with the start of the work by tearing everything down. Please pardon the toilet there. The original room was 13 feet x 17 feet. Is decent size but quite a bit tight in space. So the first thing is to get a bigger space. With the extension now the room is 17 feet x 20 feet. From the picture below, the red colour wall is where the projector screen going to be install.


This picture below is the back of the room. Had a small raise platform build up as I wanted to have 2 rows of seats. The raise floor is about 1 feet. Can't really do much as the height of the room is about 9.5 feet only. 


After the floor is taken care of, the next thing is the ceiling. Having plaster is simple and nice, however the rattling problem will still need to be address. How this is done instead of the usual aluminum frame use for conventional plaster ceiling, plywood is use instead to build the frame. In order to reduce vibration further is to fill it up with rockwool. The idea is to have weight on the plaster ceiling to help control the vibration. It cost a little more but I will say its worth the price for it. 


Speaker, power, HDMI cables are all lay in at the same time. There are 4 ceiling speakers and 4 surround speakers to be install later once is all done. 


So the basic of the room is taken of already. Next part is the electrical. I had wired the room with dedicated phase from my 3 phase electric for the room. This DB box is specially put in for the room. 
Each MCB is also direct to one power socket on the wall. 2 x of the MCB is specially direct to subwoofers. I had added many wall sockets in the room. The picture is one part of it. I just want to make sure I have enough even for future expansion.


The room is completed with wall papers and laminated wood flooring. Most of the equipment are from the existing with some additional add on. The first big thing that was the PB13. From the picture it can seen that its so much bigger compare to my tiny speaker. 


The front row seats with some recliners. It feels right during that time but soon I realized is a bad idea. Most of the time I will fall asleep on it rather finishing the movie 😆


The JVC projector is mounted  directly above the first row seat. The second row seat is 3 seater sofa. 
The roller blind is there because behind is glass wall blocks. 

First run of movie and its non other than Toy Story 3. 😊 Ever since this day, my children dominant the room more than me. 


Some movie posters just to have a bit more of cinema feel. 


Finally it is all done with the change of the room. That is all for now. This is the biggest work done for the room. Moving forward is pretty much changes of hardwares and some other minor decorative add on to the room. The room slowly do evolve a more into stereo listening as well rather than home theater which was the original purpose of the room. Will share more next week on the never ending journey.


January 30, 2021

My first ever home theater.


The very first setup was done back in year 2009. Is kind of coincidence , as I went to Harvey Norman on a weekend spotted this kind of home theater set for sale which is one of the entry level Pioneer VSX-819HK. HDMI during those days are still pretty new and this AVR has like 5 HDMI input and 1 HDMI output which is amazing. The AVR came together of course the Pioneer speakers 5.1 including the sub. I remember quite clearly it was like RM3500 for all of this. Mind you that is 11 years ago and that is quite some price to pay. This AVR is one of the earlier with DTS-MA and TrueHD surround sound format. 

Obviously just getting a home theater set without TV , doesn't make sense. Might as well look for one now together hoping for a better deal. Well, I did came across this beautiful plasma screen from Panasonic (P50S10K) which is made in Japan. Looking at it, indeed is really stunning with the black level which is the best of the days. Well it is still the best till today when comes to TV. During the plasma days, Pioneer Kuro plasma is really the pinnacle of TV technology. It is a TV use as reference for many professionals. Unfortunately Pionner didn't make it for the TV race at the end. The KURO tech is finally pass on to Panasonic which is still in use today for their TV.

Back to my shopping, the TV came with the Panasonic Bluray player (BD60) with 2 free discs. The first ever blu ray movie I own is the "Batman Begins". The second disc is "Transformer". The BD60 is really quite the cutting edge BD player from Panasonic which was beating down on Sony, although Sony is the company that created bluray format. 

Got back home and the waiting starts for Harvey Norman to deliver my new toys. It came pretty quickly next day. No setup or installation was provided , so me as a newbie who knows nuts of home theater started my first step towards some crazy adventure. Practically, I was just trying to connecting everything to make sure it works. Internet was not so handy still but I do get some help online and reading the manual. Finally after hours of meddling, it is all done and ready to go. 

I had only 2 movies, so pop in the first one "Transformer". Just watching this movie for the first time on 50" TV is really cool. It was so excited to hear all the 5.1 sound of TrueHD audio for the very first time ever in my OWN HOME......I guess you can see from the picture above it is pretty messy and the cabinet can't even fit the AVR. All this kind of lesson learn through the years later. Ever since than, the journey had never ended till today 2021 and still upgrade is on going. More and more collection of movies added. Next part of the journey will be more exciting and a lot more elaborate. Will share it soon.