November 8, 2020

Audio & Visual, My Home Theater Set Up

All this while I have only talked about my hifi. Now it's time to switch to my AV adventure. I started building my AV system at the end of 2018 and it has gone thru a few small but worthy upgrades since. I will start with an equipment roll call, which are based on items currently in used. Drum roll please! 

Starting with the most basic 4K compatible, 120 inch XY screen. Here is a China made screen that offers great bang for buck.

The XY screen features rigid aluminum frame with instructions for DIY mounting if required. I got the dealer to wall mount it for me. It has nice 80mm side frame finished in black velvet like material to frame in the projected picture.

The Optoma UHD 50 projector was chosen for it's ability to throw the biggest picture size at a reasonably short distance. In this case, it must achieve 120 inch screen size at a projection distance of just 11 feet or so. It's also cheap considering it's entry level status, but still comes with Sim 4K, i.e. up sampled 4K, non native. Picture quality is good with vivid, punchy colours and offers great contrast. Only let down is the greyish black quality, as expected from an entry level projector. Still if one doesn't compare, one will not notice. I tried to upgrade to a JVC projector, but the projection length doesn't fit my space constraint. 

Source is by default the Oppo UDP 203 4K disc player. I am glad I got this as Oppo announced they are stopping production of BD players. Very nice picture quality in up sampled 4K mode and certainly reliable too. 

As a 2nd option source in the system, I included an old Oppo UDP 95 Full HD BDP. This dinosaur BD player come from the Cinivia free period in time. I still get very decent picture quality from this player.


The back end of the Denon X-4400 H is certainly busy with lots of configuration options. I choose to set up a 5.2.4 Dolby Atmos surround system, which means 5 chanels including center, 2 sub woofers and 4 Atmos ceiling effect speakers.

When it comes to AV Receivers, my choice is always a toss between Marantz or Denon range. I chose Denon X-4400 H at the time due it's punchy sound quality. Due to the Denon's tendency to overheat when the whole 5.2.4 system is powered by it, I have decided to hook up a power amp to compliment the Denon. Hence when planning a HT system, make sure the AVR has some kind of a configurable pre-out, for the flexibility of  expanding to pre-power set up. The whole Denon X series AVRs have a tendency to overheat, from the X-1500 H to the X-4500 H, and now X-2600 H series onwards.


Little is known about this Cambridge Audio A120 4 channel power amp, except that it was a 1990's product. It pumps out a healthy 120 Watts per channel and doesn't seem to run very hot which is good.
 

I use this Cambridge Audio A120 amp for front & rear surround channel duties, taking the load off the main Denon AVR certainly helps in the sound quality and reliability of completing the whole movie. The Denon on it's own tends to overheat and trip in the middle of an average 90 minute movie! 


I managed to fulfill another childhood dream when I scored the used Bose 901 MK VI series speakers in piano gloss black. As a hifi speaker, this Bose will not meet my audiophile requirements anymore, no matter how much it inspired me during my much younger days. However as a HT main speaker. it's a great step up coming from my previous BOSE 301 MK II. The sound is lush, less direct and offers a more enveloping front effect to movie soundtracks. It also great for my occasional concert watch too! 

For my center speaker duty, I go for a single Bose 201 MK III series speaker. Tonally, it complements the Bose 901s and it's small size makes it easy to place below the screen, yet that 6 inch mid driver means I can set the center x-over point to 90 Hz for the full male vocal effect!


I use the Bose 101 series for wall mounted rear surround & Model 25 series for Atmos ceiling effect speakers. Both the Bose 101 & Model 23 series are just slightly different variations of the same speaker design. The 101 being for home in/out door use and Model 25 for pro/commercial use. The 101 has a built in passive high pass inside, while the Model 25 has a 16 ohm transformer inside, both of which I had by passed, sending audio signal direct to speaker driver, making whatever differences inside a non factor. These are great surround & Atmos speakers due to their easy wall/ceiling mounting brackets.
 

I am a self confessed bass freak and nothing can change that, so having multiple sub woofers in my HT set up can only satisfy me. This Bose Acoustimas 5 series sub woofer is used to augment the Bose 101 as part of rear surround solution. The built in x-over in the Acoustimas helps to protect the rear surround channel from being over loaded in the loudest soundtracks, yet also allows me to set my rear surround to 80 Hz high pass, for that full range surround effect! By the way it doesn't count as a sub woofer in my system, even though it is one by any physical means.


When it comes to sub woofers, the SVS PB 2000 is my main squeeze. I started with a single one, as a 5.1.2 Dobly Atmos system, but as I moved to 5.2.4, it just made sense to add another SVS PB 2000 as the single one was feeling somewhat lonely. Adding the extra sub woofer allowed to bass management response to be more linear, projects more even bass spread around the room and less clipping in high octane explosion movie scenes.

If there ever was a best value trophy component in my HT system in terms of functionality, this Weiduka AC 8.8 power conditioner takes it! These days LED lighting source rules and my HT room is filled with all kinds of soft glowing LED lights. LED lights however come with very noisy switching power supply. I starting having high pitched dee.....eeeeee sound when my HT was switched on together with the LED mood lights when I didn't want to watch movies in the dark. I then fitted this Weiduka device in, powering all my source, AVR & power amp, and poof! The dee.....eeeee high pitch noise was gone........... And that's no psycho acoustic effect either! I also power my HT system with a variety of power cords from Lapp, Gotham & Furutech.  


All low level audio signals are routed via Monster THX 400 RCA for HT, 2 pairs were used to connect between the Denon AVR & the Cambridge Audio power amp. love those rubberized soft touch, yet grippy RCA plugs for easy handling, especially once installed behind my HT equipment rack. 
 
And lastly speaker cables are all generic use budgetary roll. 3 rolls of 30 meters was used to complete my HT project.

 
I initially had 12 meters of pro grade HDMI cable installed between my source/AVR to beam visual signal to my projector. At point of planning & wiring the project room, 4K compliant cables were few & far in between. While most of my disc collections are Full HD BD, the few 4K source that I had were problematic. The picture would blink every now & then with 4K source. I check on the web indicated I needed this optical HDMI cable. And so I bought this 15 meter roll from FIBBR during one of my trips to Guangzhou back in 2019. 

As you can see, virtually all my chosen components for the HT system are either entry level, or well used items. I also don't want to spend too much $$$ on cables or accessories. Next, I will show the whole completed she bang in my HT room, measuring 17ft x 13ft x 9ft(W x L x H).

October 27, 2020

A Hi-Fi Trip to Ipoh - Part 3 - KUZMA / AUDIO RESEARCH / VITUS / MAGICO

Mr. Lam's system was the third and last stop on our Ipoh trip. The system was tucked into a cosy room in the house that also doubled as an AV room. 

The room was tastefully decorated, with the fittings also doubled up subtly as room treatment, as can be seen in the photos below. The uneven bricks making up the front wall, and the timber strips on the ceiling would also act as sound diffuser, while the randomly placed foam pieces on the ceiling and the carpet on the floor would help to dampen the room. 


To treat the side walls, acoustic panels from Vicoustic were placed on the reflection points: 

Lam's system was as follows:
BMC Audio CD player, which Lam did not play during our visit

We listened exclusively to Lam's all Kuzma analogue rig shown above. The turntable was the Kuzma Stabi R turntable...
with the Kuzma 4point arm...
...and the Kuzma CAR-50 cartridge,

...feeding the Audio Research Reference Phono 10 phono stage, which came with a separate power supply


The line preamplifier was also from Audio Research - the Reference 10 line stage also with a separate power supply chassis

A peep into the Reference 10's separate, tube-based power supply

The power amp was a 85kg behemoth, the Vitus SS-103. It came with 50w on tap in class A mode and 150w in class AB mode. Lam thought the class A mode sounded better, that was also how we listened to the amp during our visit
 

The loudspeakers were the Magico S5 

...fitted with very substantial-looking upgrade spikes from Magico

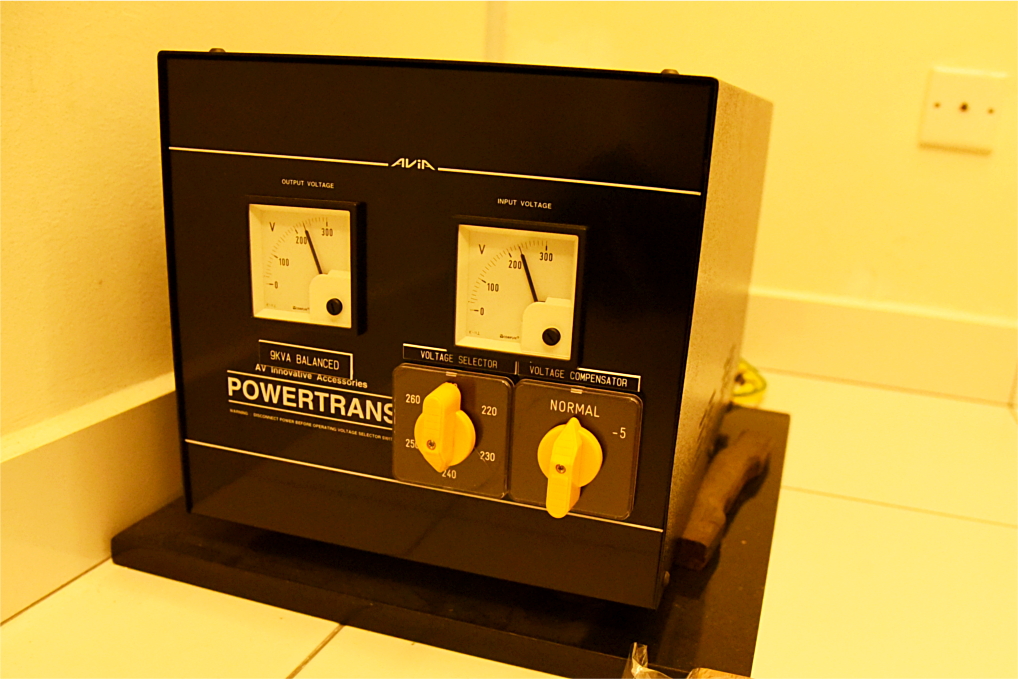
Power conditioning was taken care of by a Powertrans power conditioner fitted with 9kVA isolation transformer
I like this idea. The Powertrans was placed outside the listening room, and the power cables were routed through drilled-through holes on the wall to get into the room. 


The sound from Lam's HiFi system was big. It was room-filling and then some, given the pedigree of the equipment here, that was no surprise. 

The 50w Class A power from the Vitus amp controlled the big Magico S5 very well, I couldn't hear any compression let alone any distortion at any time, not even during orchestral crescendos. The sound also had an overall roundness to it, it was dynamic but never aggressive, very similar to my past experience of Magico loudspeakers. In addition, there was a layer of what I think many audiophiles would call 'analogue-ness' to the presentation, wherein one wouldn't term the sound as 'analytical' but still there was a high degree of details in it. Here, that was further coupled with a buttery, smooth flow of the music. Well, it must have been the combined effect of the LP frontend and the top-of-line tube preamps, perhaps?  

The highs from the Magico's Be tweeters were very smooth. The mid was vivid, it came with a good saturation of tonal colours, definitely not the thin nor washed out kind that lesser speakers could exhibit. The lows, with two 10in woofers per side operating in a midsize room, dug deep and was very strong, just as expected. The bass notes sounded big, but, and this was critical, they never spilt into the muddy, boomy territory. Overall, I thought the bass region stole the show a little bit, though that also added excitement in the listening session. We were invariably swept up in the unbridled energy exhibited by the music and went on a thrilling ride, what a sensation that only a sizeable and capable system like this could deliver!

A well put together system coupled with a conducive room equals sensational music replay. Lam sure has reaped great rewards from his effort!

Thus concludes our Ipoh trip. There are many more HiFi systems in Ipoh, hope I'll get to savour more of them in the near future.

October 18, 2020

Chasing A Childhood Dream, Nakamichi DR-2 Cassette Deck


The Nakamichi DR-2. Love those amber display illumination!

If you have followed my hifi journey long enough, I had always talked about one particular childhood experience that started me on the road to audiophilia. That was when I was a young teenager, visiting my friend's house for the first time, he played Papa bear's hifi system, which was set up in the family lounge. It was a simple set up comprising a Nakamichi(an RX series I think) cassette deck, a Sansui amplifier and a pair of Bose 901 speakers. That system really sounded out of this world to me then. Since then, I always wanted 2 items from that system, a pair of Bose 901 speakers, checked! And that elusive Nakamichi cassette deck.

I could never bring myself to afford one and eventually settled on the Teac V-670 that I wrote about sometime ago. For more than 30 years, that Teac 3 head cassette deck had served me well. My recent refurbished Teac had gave me hours of fun, rekindling with the cassette format. I was a happy bunny until I saw this Nakamichi DR-2 on a local hifi classifieds, which I told my self, it's now or never. 
The simple line in and output RCAs typical of a cassette deck. The rear panel and chassis bottom is double layered!

And so here I am, a proud owner of a Nakamichi DR-2. It had all the right specs I wanted in a cassette deck, like 3 heads(a must), 3 motor, dual capstan transport design, illuminated cassette compartment and if possible a remote control! Dolby S never featured highly on my wish list, as B & C was more then enough for noise reduction. This Nakamichi is a 90's product, made from 1992 till 1996. The DR series comes after the well loved CR series from the 80's. In the Nakamichi scheme of things, the DR-2 wasn't considered particularly high end either. Well, it certainly was no Dragon, or the 1000ZXL or the ZX-9, BX-300(a.k.a. baby Dragon) or the CR-7 either. Those are just some of the best tape decks ever produced by Nakamichi, not forgetting to mention the RX-505 which was an auto reverse playback stunner, but as a recorder, not so great. 
The 3 head, 3 motor, dual capstan transport is originally developed by Nakamichi in the 70's and first appeared on the 1000ZXL model. 

The Nakamichi DR-2 had great build quality, not flagship level but luxurious enough to include a metal cassette door, the opening action of the said door is well dampened, satin black finished aluminum face plate, dual layer back plate & chassis. Weighting at 5.6kg, it's almost twice as heavy compared to my Teac V-670. Some of the flagship feature omissions include lack of peak hold VU meter, no auto tape type selector(only the flagship DR-1 had that), non-motorized cassette door and a remote control. I would say this DR-2 had all the basic requirements of a good tape recorder & playback, but gave up on luxurious features for market price point. In cassette time line, the 90's was already sun setting for the format, so if one wanted a top player, the 80's would be a good time line to start. Mid 80's flagship cassette decks from Japan like Teac V-980 & Aiwa AD-F990 had all the best features that looked like a dream list.   
The 3 motors that drive the transport can be clearly seen here!

As with any Nakamichi, the tape transport is an in house design, and not one of those standard of the shelf Sankyo solutions used by many other manufacturers. The 3 motor design, incorporating idler wheel for tape spool is very complicated and the transport design is multi layered. Also new in this generation of Nakamichi is the pressure pad lifter system. What's this you ask? If you look at the cassette on the side with the exposed tape holes, you'll find a sponge like pad in the middle as the tape head contact area. Nakamichi believes this pressure pad contribute to variable sound quality as each tape is using different material and density for the pad! Nakamichi was very confident that their dual capstan transport drive was powerful and accurate enough to give proper & constant pressure to the tape in contact with tape head, that the pressure pad was no longer needed during playback. This gives the DR-2 very low wow & flutter during playback as direct result. You can see from the naked photo below, the power supply transformer is over sized and has more than a few regulator circuits in a separate PCB from the audio section on the left. The internal build quality is typical 80's -90's Japanese thru hole PCB type for easy repair. And no, for some reason Nakamichi didn't see fit to give gold plated RCA sockets either!
The internals of the Nakamichi DR-2 cassette deck shows much attention to detail.

Lastly we come to the sound, I was not disappointed at all, once I plugged the DR-2 in to my system and start the first tape playback. The first thing I notice was a total lack of hiss or white noise, which is always good for sound quality. Next comes the rich, layered with full bodied tonality and that dynamic transient of the snare drum! Bass was ripe, full and tuneful. In comparison, the Teac V-670 sounded neutral in tonality, and offering more clarity yet conjured a more 2D version of the musical proceedings. The Nakamichi does lives up to it's sonic superiority promise. Every cassette I put in sounded good, even those pre-recorded original tapes. The better the tape type, the better it sounded.

The Nakamichi DR-2 is a very nice addition to my hifi collection indeed and it enhances my cassette playback experience too. Simply love it!

October 9, 2020

A Hi-Fi Trip to Ipoh - Part 2 - ACOUSTIC SIGNATURE / EAR / AUDIO RESEARCH / WILSON AUDIO

Mr. Pung's place was our second stop on our Ipoh trip. He is a respected veteran in the Ipoh HiFi scene and has an extensive audiophile network there. Our one-day trip was organized via him, so we'd very much like to thank him for his time and effort. 


Pung's system was also located in a dedicated audio room. He had paid particular attention to acoustic treatment of his room lately. Just as many of us know, room acoustic could make or break a system's performance. In addition, Pung was also diligent in loudspeaker positioning, you could see markings on the floor of the various positions that he had tried.

The photos below demonstrate the extensive effort Pung put into treating his room. He did it with a myriad of absorbing (soft) and diffusing (hard and uneven) materials. Having a good mix of both is a correct approach as this would avoid the pitfall of having the sound skewing too much to one particular direction, for example a lot of absorptive material would give a quiet room but the sound could be dull as the high frequency is curtailed.   

The acoustic treatment was not all done in one go. He experimented with the quantity and placement over time. Sometime he would reverse what he did previously. That is definitely a good strategy that I'd also endorse. Flexibility is important for acoustic treatment as the treatment must be suitable for the character of that particular room and the system that is used in it. 

Our listening session borne out Pung's effort. The room had no discernable echo nor was it overly reverberant, both are things that mess up the sound when playing music. Neither were there boominess in the bass region nor over-brightness in the highs too.

Acoustic treatment on the ceiling, the front wall and the corners 

Acoustic treatment on the side wall's first reflection point and the rest of the wall 


Let's take a tour of Pung's system:


The source we listened to was exclusively analog, it was a Acoustic Signature turntable and arm, fitted with a ZYX cartridge. Pung told us he was waiting for his dCS digital stack to be delivered soon

EAR 324 phono pre-amplifier

Audio Research Reference 6 Preamplifier

Audio Research Reference 150 power amp


The Wilson Audio WATT/Puppy 7

The WATT
The Puppy

I think Audio Research and Wilson are a very good match. This was the second time that I heard this combination producing great sound, so I think this was not a fluke. This system avoided all the pitfalls of Wilson speakers when they were not well matched, where they would sound aggressive, sharp, hard and/or harsh. And it retained all the good traits of these Wilsons, sounding big, free with dynamics, and lightning fast with attack. In addition to the amp-speaker pairing. I believe Pung's effort in doing acoustic treatment also contributed substantially to this performance. 

That was not all, it was a balanced performance from top to bottom in terms of highs, mid, lows, and I wondered whether it was the LP frontend, that the tonal color was rather vivid, definitely not the dull or washed-out kind. All sorts of music replay was also imbued with a certain warmth, so the musicality of each recording came through very well. 

This was an enjoyable listening session. It goes to show that putting some tender loving care in the room treatment department, speaker positioning and smart equipment matching can pay huge dividends. Hats off to Pung!