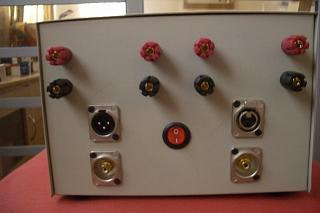
Here it is! My DIY version of a kable kooker.
First a declaration before I proceed with this article. I have never seen the actual Audio Dharma Cable Cooker before embarking on this project. I have, however seen some pictures available here on this blog and else where on the www.
 The rear panel with IEC and fuse holder.
I just made an educated guess that it will sort of work this way, and along the way have the guiding hand of a senior DIYer. From the photos and pictures I've seen, the commercially available cable cooker works by supplying 12V A/C to the cables and applying the appropriate resistance to each intended cable to simulate the necessary load, like 8.2 ohms @ 50W for speakers cables, 75 ohms @ 2W for RCA and 100 ohms @ 2W for XLR interconnects.
 The transfomer, note ratings.
To start with a 6V 0 6V @ 3 amps rated transformer is used to step down from our 240V wall supply via an IEC socket and ON/OFF switch with indicator, fused with 0.5 amp 30mm fuse, for safety purposes. From the step down voltage of 6V 0 6V, power is parallel supplied to the out put speaker connectors, RCA and XLR connectors. On the receiving end of connectors, are resistors attached, to simulate load on the cables when connected to form an electrical loop. See connection picture for a better idea.
 The internals, note the load resistors on the right side.
Like the commercially available unit in use, the DIY kable kooker will need some adaptors to work. It will need a female - female RCA connector to cook a pair of RCA simultaneously. It will also need a speaker(spade/banana) connector - wall plug converter and an IEC - speaker(spade/banana) connector for cooking power cords, which I have yet to build, but can easily do so should the need arises.
 Another look at the connections, from the back. Note that everything is reversed!
For XLR interconnect cooking, just connect the pair of XLR's output to input before routing them back to the kable kooker to form an electrical loop.
 Kable Kooker in action, top is back panel, bottom is front panel. Abbey Road speaker cables and AQ Sky XLR cooked in pairs simultaneously.
It was a fun and easy project for me as it took about 2 hours to finalise component list, circuit and layout. Half a day at Jalan Pasar(Kuala Lumpur's electronics supply area) to pick up the parts and another one day to drill the necessary holes, fit all the plugs, sockets and connectors plus finally, wiring it all up.
 Another cooking view from front panel.
The kable kooker project was born out of the necessity to cook the Abbey Road speaker cables reviewed earlier. Whilst at it, I also took the opportunity to cook my AQ Sky XLR pair of interconnect. I can in fact use the kable kooker to cook all 3 types of cables in pairs at one go! that's how versatile it is. Like the Audio Dharma unit, the DIY kable kooker runs rather warm when doing it's job. The RCA and XLR sockets should also run a little warm when cables are inserted for cooking.
I do not have the chance to A/B it's effectiveness against the "Real McCoy" but my own subjective post cooked cable experiences echoes those of the Audio Dharma users reported here earlier.
The usual DIY caveat applies should you decide to build one for yourself. I cannot be held responsible for any loss, damage equipment, shock hazard, injuries or death as a result of negligence from following my posting here. Please DIY at your own risk.
No comments:
Post a Comment