February 27, 2021

Man cave diversity

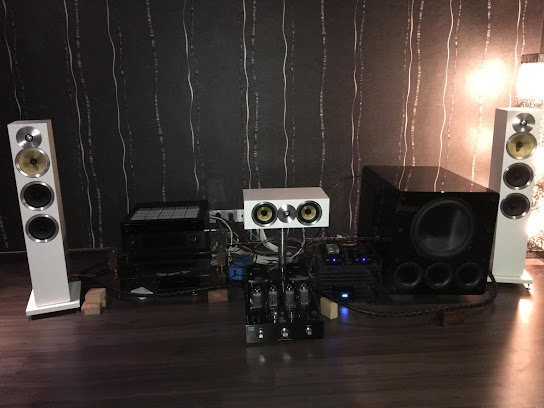
After the completion of the room setup for home theater, I am pretty happy with the result and watching movie is never the same again. At the same time, other part of me getting itchy again. I was thinking now about what I can do more. During this time, I was experimenting of some DIY players which I wanted to use it for music playback. It has been a couple of years trying many different solution but don't really find something I like. Finally found this little box. Inside this plastic box is a single board computer from Asus (Tinkerboard). With this I am more enthusiast about now in music. The thing is I still need a DAC for this to work. 


I started hunting around to see what I can get. I had an old Arcam Irdac but doesn't support DSD. During this time, I was also looking for some other hardware to replaced my integrated amplifier. I guess is the timing or coincidence but I bump into Wadia DAC. Personally I only know Wadia by reputation of being the leader in DAC. I had an audition in Perfect Hifi on the Wadia hook up to the KEF REF3 speakers. Just simply listening to it already make me want to just swipe my credit card and take it home. That is exactly what I did. Now the Wadia 322di is seating in my room, LOVELY.......


At the same time I also picked up the Audio Research from Perfect Hifi. The pre-amp LS25 tube pre which is what I need as I need the function of HT bypass as it will be use together in the home theater setup. As I still needed a power amp to complete the setup and I gotten a use Audio Research REF110 from a friend of mine. Now it is a complete set. This stack of hardware is pretty much dedicated to hifi use. This is also the point of no return in getting myself into the rabbit hole of hifi world.


Personally I think I still need to get some basic right before going further into more hardware. Lets get the fundamental which is the power (electric) right. I came across Frank Power bank during KLAV and I decided to give it a try. Frank Voon is really a very nice guy to deal with and he came to install the power bank into my room. Now I don't just love my music but is totally awesome. 


Now I feel like this is maximizing the room and also the speakers. I totally never regret in getting into hifi. Although a very good friend of mine did poison me about it. During this meddling around with cables (speaker, interconnect, power), even changing all kind sockets, plugs. The speaker also had additional 2 inch white oak plinth under to get better stereo imaging. Many other voodoo as well as it goes. Well this is all the fun part of the hobby. Hope you guys enjoy it. 


February 21, 2021

Man cave construction & transformation

5 years later from the day I have my own dedicated man cave. Its time to go a little bit further. I had from my first experience in having a dedicated room was the fact that, plaster ceiling in the room is a big headache. The simple reason, is the LFE from the subwoofer is creating music on the ceiling. 😋 Its pretty annoying while you are so concentrated in the movie. Second lesson, is the power supply for the room is very important and is necessary to have enough of juice. 

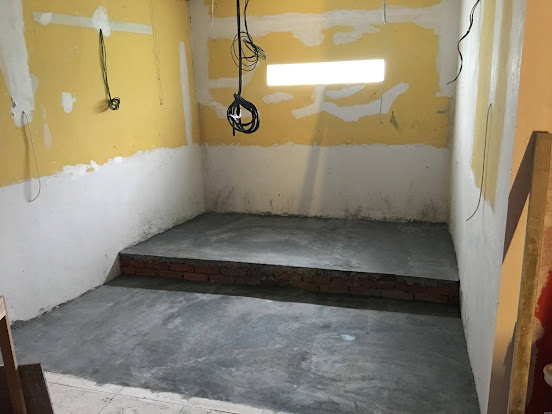
So here we go with the start of the work by tearing everything down. Please pardon the toilet there. The original room was 13 feet x 17 feet. Is decent size but quite a bit tight in space. So the first thing is to get a bigger space. With the extension now the room is 17 feet x 20 feet. From the picture below, the red colour wall is where the projector screen going to be install.


This picture below is the back of the room. Had a small raise platform build up as I wanted to have 2 rows of seats. The raise floor is about 1 feet. Can't really do much as the height of the room is about 9.5 feet only. 


After the floor is taken care of, the next thing is the ceiling. Having plaster is simple and nice, however the rattling problem will still need to be address. How this is done instead of the usual aluminum frame use for conventional plaster ceiling, plywood is use instead to build the frame. In order to reduce vibration further is to fill it up with rockwool. The idea is to have weight on the plaster ceiling to help control the vibration. It cost a little more but I will say its worth the price for it. 


Speaker, power, HDMI cables are all lay in at the same time. There are 4 ceiling speakers and 4 surround speakers to be install later once is all done. 


So the basic of the room is taken of already. Next part is the electrical. I had wired the room with dedicated phase from my 3 phase electric for the room. This DB box is specially put in for the room. 
Each MCB is also direct to one power socket on the wall. 2 x of the MCB is specially direct to subwoofers. I had added many wall sockets in the room. The picture is one part of it. I just want to make sure I have enough even for future expansion.


The room is completed with wall papers and laminated wood flooring. Most of the equipment are from the existing with some additional add on. The first big thing that was the PB13. From the picture it can seen that its so much bigger compare to my tiny speaker. 


The front row seats with some recliners. It feels right during that time but soon I realized is a bad idea. Most of the time I will fall asleep on it rather finishing the movie 😆


The JVC projector is mounted  directly above the first row seat. The second row seat is 3 seater sofa. 
The roller blind is there because behind is glass wall blocks. 

First run of movie and its non other than Toy Story 3. 😊 Ever since this day, my children dominant the room more than me. 


Some movie posters just to have a bit more of cinema feel. 


Finally it is all done with the change of the room. That is all for now. This is the biggest work done for the room. Moving forward is pretty much changes of hardwares and some other minor decorative add on to the room. The room slowly do evolve a more into stereo listening as well rather than home theater which was the original purpose of the room. Will share more next week on the never ending journey.


February 20, 2021

Go Big Or Go Home! Torus Power RM 16 AVR

Torus Power RM16 AVR


Torus Power RM8 AVR, spot the diference?


It's been a good 10 years since I've settled down with the Torus Power RM8 AVR. Read my original review here:  http://hifi-unlimited.blogspot.com/search/label/Torus%20Power

I have been happy with my chosen power supply solution for so long, I had never considered any form of change or up grade. For me, the Torus Power RM8 AVR is always a keeper. 10 years is a long time in any product life cycle, and unlike any of my other hifi equipment that came & went, the Torus Power stayed. Even when I moth balled my hifi and took a sabbatical then restart, I still stayed the course with the RM8 AVR, as I believed even with newer generation products in the market, the Torus Power remains one of the top solutions when it comes to power supply & conditioning.

The Torus Power is a balanced transformer based design with a voltage regulator circuit added for good measure, keeping the output voltage at 230V+/-10V range. In my hands, 10 un-eventful years passed by with no wants, and the Torus Power more than satisfying my hifi power needs.

Then came one fateful day a local used hifi classifieds this Torus Power RM16 AVR appeared and I started thinking, hmm..........., what if? After consideration of the worst outcome would be that I just spent a few thousand to top up a trade in deal, would result in no sound improvement!

I called the dealer who put up the advert, made the deal discussion and the rest was set in motion. a few days later, the dealer called that he would deliver to the Torus Power RM16 AVR to my place, and bring the RM8 back as a trade in. Weighting at nearly 60kgs. 3 of us  had a tough time bringing the RM16 AVR up 2 flights of stairs in to my man cave, located in the 1st floor of my house. Once that was done, bringing down the 40kgs RM8 AVR was less of a problem.  

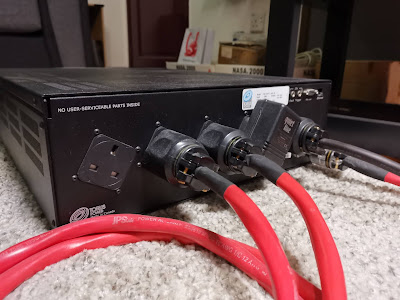
This is the Torus Power RM8 AVR with 5 UK style power points, the RM16 AVR has only 1 extra point, even though it has double the power supply capacity! 


I proceed to plug the RM16 AVR in to my system and realized that despite the big heavy box, I only got 6 UK style power points, compared to 5 on the RM8 AVR. However, I only needed 4 to use om my system.

I fire up the system, not expecting much sound difference nor improvements. I am totally surprised by what I heard. 2 things stood out the moment the first track played on my Sony CDP X-7 ESD CD player, first the already black background just got blacker......, like black hole to nothingness, it's eerie! Next the high frequencies gain a buttery smoothness, a much longer tail end decay in to that black nothingness. I get the same full bodied, thick mid range magic as before. However the bass took on a more integrated in to the sound stage character. In the past I could still hear some the bass notes coming from the woofers of my PMC IB-2i speakers, but now all the bass is coming from the front stage imaging! another bass area improvement was the flabbiness. Forcing the big boy PMC speakers in to a small room was kinda cramping it's style. I had some degree of bass flabbiness that vibrated that whole room when then particular room mode hit! Funnily enough, the Torus Power RM16 AVR with is double capacity had much, much more grip on those 10 inch pistonic bass woofers that PMC uses. That bass flabbiness as mentioned, whilst not totally eliminated, was however, much reduced, to the point it's barely noticed. I guess there are limitations when going against the law of physics?

Overall, going the double the power supply didn't make sense at first. You see, my system was barely drawing 3 amps peak and when using the RM8 AVR, I already had more than double the headroom to spare. I was thinking buying more head room was probably a suckers game! However, now after a week in to the change over, I felt the trade up was more than a fair deal. I am glad I done it!

Wishing all our regular readers GONG XI FA CAI!  


February 13, 2021

Two in one system

Starting from the living room and moving into the dedicated room, the journey continues. All this while, I am doing the room for home theater purpose. Watching movie have never been the same again once you a have dedicated room. Although I had enjoy much of movies but something else crept up on my mind. What about stereo music ? The B&W speaker is really made for stereo and using it only for home theater is not fully utilizing it. Now having that in mind, I do something that is capable doing double duty. After doing some research and some consultation with friends, decided to get rid of the Emotiva processor and the power amp.


Looking from the pic above you can see that I had gone back to AVR from pre pro setup. This is the Yamaha A-3050 , the first Yamaha AVR that supports Dolby Atmos and DTS X. The model is from year 2015 and is the top of the line Yamaha AVR in that time. This is a 11.2 channel AVR. The price is very reasonable too, roughly about RM7,000. Keeping in mind that I wanted dual usage on my setup, I wanted Yamaha for the neutral sound. So this AVR will serve the purpose of surround sound and also pre amp on stereo.


Next up will be the new integrated amplifier which was highly recommended by a friend of mine. This is the Musical Paradise MP-501 integrated tube amp. It has 4 x KT150 power tubes which is capable of 65 watt in stereo mode. Coming from solid state amp into tube, it really makes me love music. The price for this nice amp is about RM6500, I guess is quite ok for this is a China brand. One of the important factor is that this integrated amp support HT bypass. With the HT bypass feature, with just a flip of a switch it can be an integrated amp or merely being a power amp only. This serve the purpose for me to be able to have pure 2 channel and also using it as power amp for the home theater. 


So now we have all the hardware for the audio, except that I still needed something to playback for my audio. This is the first time I have venture into digital audio playback. Had been reading quite a bit online on DAC. To be honest after much reading, I still don't quite know what is the DAC going to do for me. Nevertheless, I went to get this Arcam rDAC. A very simple dac with coaxial, USB and optical input with 1 pair of analogue output. It pretty much do 24/192 sampling. I simply hook up my Dell laptop to it play with foobar. All the files are loaded in external hard drive to be use. 


This is how the overall setup had changed into with the Yamaha, tube amp and the Arcam DAC. This is pretty decent given the fact that I have no idea what I was doing but just reading from internet. As a matter of fact, I had enjoy it very much. Hifi is really something far more complicated than home theater. Getting music nirvana is something I had invested a lot more than my home theater throughout the years. Till today, there are more things that I had wanted but still haven't get the chance to try it out. Hopefully this year will the the time to venture into analogue audio with vinyl record and turntable. Till that time comes, the journey continue.

February 9, 2021

"The Abyss"

I am glad to highlight another Malaysian designed Malaysian made HiFi device here.

If you are a frequent visitor to our local HiFi sales and discussion forum https://www.hifi4sale.net/, you'd be familiar with DrWho. DrWho is also known within our HiFi circle as Yoong. In addition to doling out HiFi wisdom, he is also into designing and making earthing devices for HiFi nowadays, which is the focus of this write-up.

I'll let Yoong tell you in his own words what his earthing device is meant to do:

"The main purpose of the hifi equipment ground or other electrical appliances ground is to divert the electricity away in case of a short circuit in the equipment. Audiophiles are aware that sharing a common ground with the house ground will deteriorate the sound quality. For that reason, many audiophiles use a separate ground solely for their hifi system. 

RFI and EMR noise from the surrounding environment are picked up by the various exposed metal parts of the hifi equipment. These high frequency signals are noise to the hifi system. The high frequency signals cannot be easily drain via the conventional grounding system due to the very low current they carry. Thus, it necessitates a separate grounding device that can easily dump the RFI and EMR signals in the form of heat. The grounding device works by allowing the signal microcurrent travel through a special medium continuously until it turns into heat. The different frequency signals decay into heat differently. The type of medium in this grounding device is selected to ensure that it is able to decay the noise signals that affect the complete frequency range of the hifi system, from highs, mids to lows.

I want to name the grounding device as 'The Abyss'."

So now you also know where the title of this post comes from. 

Talking about electromagnetic radiation in our surroundings, I noticed that in my listening room, with my handphone, I can not only detect the 4G signal of my mobile service provider (and other service providers' signals must be around too) and the Wifi signal for my own house, I could also detect Wifi signals from half a dozen neighbours or so, and this is before we talk about EMF from other electrical appliances lying around. So yes, I think my environment is electrically noisy and dirty. 

The Abyss is simple and functional. A thin wire leads out from the top of its main body, which is a shiny stainless steel cylinder that is completely sealed, and the wire is terminated with a crocodile clip. The clip is to be clipped onto any protruding bolt or screw head on the equipment that you want to 'earth'. 

Based on Yoong's advice, I tried it on my CD player, preamp and power conditioner. The effect was the same, though I thought the effect on the power conditioner was the least pronounced. 

on my pre-amp

on my CDP

The effect wrought by The Abyss was quite immediate. I didn't have to "run in" the device like for other HiFi equipment. 

The first prominent effect I heard was a cleaner treble that was without grit and any sharpness. The highs became silkier, and sibilance, wherever existing, was greatly reduced. Music could be played louder without heightened harshness. The treble region acquired an added gentleness so to speak.

Secondly, there was a quieter background in between images/instruments, which also improved separation and image specificity. The midrange was also clearer. 

The most surprising effect that I didn't expect at all was in the bass region. Bass notes were more focused and more well defined, like they have shed that little extra fat they have been carrying.  

Overall, system resolution was further improved with reduction of hash in the sonic picture. 

At Yoong’s suggestion again, I hooked the device up to the cover of the MCB box in my living room. Its effect was consistent with before. Using it on the MCB box was amazing as its effect was hardly diminished despite the distance from the ground floor of my house to my listening room on the 2nd floor (the power sockets supplying my system is directly wired from the MCB to my listening room though). Furthermore I noticed an effect on my LED TV In my living room where there was less noise and less hash again with the picture quality (the power socket for my TV is also directly wired from the MCB). 

So, will The Abyss be effective for everyone? I think its effect will depend on the extent of the problem your system is suffering from, the kind of problem that The Abyss is built to cure. Especially if your HiFi sounded noisy or rough or the highs were ear-poking, and you have done all you could to try to cure them but failed, then I think you should give The Abyss a go, it may work wonders for you! 

Subsequent to my test, Yoong told me that he has come up with a MkII version of The Abyss. Now, the earthing wire is detachable and an antenna could be attached instead (see photos below). Yoong said that multiple units with the antenna configuration can be placed at the corners of your listening room for example.


Email Yoong to discuss further if you like to know more about The Abyss or to pry a unit out of him (he has a few units made) to try out yourself. Email address - yoong@yoong.org. 

February 7, 2021

First dedicated room setup

 After years of setup in my living room on the upper floor, finally I got a chance to get into my own dedicated room (Man Cave). It's a bit of a luck I found a house with good space to have a home theater room. The room size is about 10 feet x 17 feet. First thing was getting rid of all my old gears of Pioneer. Than came this white colour pair of B&W CM8 with matching center of CMC. Got it from the B&W showroom which is now located in the "Garden Mall". Back in year 2009 the set of speakers cost about RM12k, the price had gone like 40% up since than. Somehow I got a thing of white coloured speakers. Even till now , every speakers that I own are white.

Now the hardware that is going to be driving the speakers are non other than the famous EMOTIVA. This is my first experience with pre pro setup. The processor is the UMC-1 and the power amp is the XPA-5 gen 1. Bought it direct from EMOTIVA in the states and had it Fedex to KL. Currently it will be a lot easier to get EMOTIVA from Max Audio in Seremban. The processor is a 7.1 supporting DTS-MA and TrueHD with 3D passthrough. It uses the first generation of DIRAC auto calibration. Very good software I will say, although I know nuts about auto calibration still. The XPA is a 5 channel power amp with 200 watt per channel (All Running). Its definitely a power house. 

Now on the left side of the picture , standing tall is the non other than the SVS PC-12NSD subwoofer. Its a 12inch subwoofer down firing. Its cylinder just like a tall drum with its driver at the bottom of it. The sub is driven by 400watt of sledge amp of SVS. This sub had quite a small foot print as it is standing rather than a square box. Nevertheless it is a capable sub in rattling the ceiling. Will speak more about the ceiling rattling , which is definitely a mistake. Another topic to discuss next time.


On the back of the room is the surround speaker of KEF IQ-8. Its a di-pole speakers bought from highway laser. I couldn't find white colour on this one, so have to live with it. Being at the back of the room, unfortunately I don't have enough space to mount them on the wall so ended up on speaker stand. Also due to the narrow room, I have to put the case behind the room for all the movies. Many DVD still but the BD collection is slowly growing. Eventually all this DVD are dump few years later. 


From my previous living room setup still what it is now in this room certainly it has change significantly. Now I really love my home theater. Well the only thing didn't change was my old plasma TV. Eventually I got it upgraded as well from 50" to 65" plasma. Will share more upgrades next time.


February 6, 2021

The Entry Level 2021, A New Set Up

The Entry Level Set Up

It's been a while since my last article, but it doesn't mean I have not been busy. If you've been following my restoration of a pair of  Acoustic Research M6 Holographic Tower Speakers, link here if you wanna read: http://hifi-unlimited.blogspot.com/2020/09/another-classic-restoration-acoustic.html

A buddy of mine have been rather keen to take it up for use as a simple system to relax in his bed room. However, he is an everyday guy with up to date everyday needs, meaning he wants to wireless stream music & remote control the system from his smart phone, plays MP3 music files on a USB stick and the occasional CD, if he is in the mood for sound decent sound quality. His needs are more of a practicality & connectivity, with absolute sound quality being less of a priority. i.e, he is not strictly dyed in the wool audiophile, but rather someone who wants decent sound quality, but with connectivity of a modern lifestyle system. And yes, he has provided a budget for me to work on too!

I set about studying the features he needs and the available components that will meet his requirements. but yet still providing high enough quality sound, while meeting his budgetary concerns.


Teac PD 650-B CD Player With USB Input

After going through the products that meet the budget, and lifestyle vs sound requirements, I have decided to start the set up with a CD player c/w front panel USB input for MP3 convenience, which lead me to the Teac PD 650-B model with see here. Retailing at just MYR 1380/unit, it's quite possibly the cheapest CD player with USB input and hifi brand credibility. After all, Teac used to make many good studio grade components. 

The plastic finished front panel still looks & feels solidly built, despite it's humble price tag. The satin black finished unit still looks & feels very decent to touch. The weight is not too heavy of course, but enough not to make it feel cheap. The central CD drawer design ejects in & out smoothly and all front panel buttons work with an reassuring "click".  The unit comes with a basic plastic remote for convenience too.


Yamaha R-N602 Receiver

The next star in this system line up is the amplifier, the heart of any self respecting hifi system, or in this case rather, a receiver, which in these days seems to be making a comeback of sorts. This Yamaha R-N602 is handsome, with pseudo classic looks that is functional and well built at one go. The Yamaha comes with all the modern feature that any audiophile or otherwise could want in a receiver. It has built in wifi, which could be wireless or wired, USB input for smart phone connection or just for playing MP3 music files, and it even connects to your smart phone via Bluetooth. Last but not least, once wifi is set up & connected, one can down load Yamaha's Musicast  app to your smart phone to access the Yamaha receiver wireless. Musicast app can be used as a remote control function or, play music flies stored on your smart phone. As a bonus, the receiver also come with FM/AM tuner.

The Yamaha receiver is rated at 80W RMS power output and the internal bits, such as beefy EI transformer for power supply, and over size heatsinks tells me the hardware is serious stuff! There are multiple RCA inputs at the back and the amp section can drive 2 pairs of speaker at once if required. 


Acoustic Research M6 Holographic Tower Speakers

The speaker in this system is my recently restored Acoustic Research M6 Holographic Tower Speakers. These are considered pinnacle of 90's speaker design and frankly, it still sounds pretty darn good today. Tonal balance is on the rich side of things, and the speaker is capable of projecting a big open sound space that is very transparent, yet managing to sound musical. With a built in sub woofer at the bottom cabinet, a nice weighty, low bass is there to anchor the music. This is an efficient speaker design and the Yamaha's 80W RMS feels comfortable pushing this speaker to it's fullest potential.

Ancillary items used in setting up this system includes a pair of Cardas Hexlink 5C RCA cable, a pair of Belden speaker cables, and a Weiduka AC2.2 power bar for power conditioning. Setting up the simple 3 component system was easy as A,B,C!
  
Once hooked up, the overall sound of this system was high musical of the foot tapping kind. I played The Best Of Yazoo CD from the Teac CD player and I was dancing to the music. Yazoo's blend of punk pop fusion music is synthesizer heavy and can sound distractingly jaunty and tiring in the wrong system, but here it actually sounded very nice. The near neutral tone with just a tinge of warmness from the Yamaha saved the day. Now, how did I tell who was doing what sound wise?

You see, both the Yamaha & the Teac allows USB input, and that is where the similarity and sound differentiation can be easily identified. When playing some of my old Canto pop music on MP3 via the USB stick, I first plugged in to the Teac CD player and then do the same via the USB input of the Yamaha  receiver. From the Teac, the sound was as per described earlier as playing CD, only less details and resolution, and maybe just a tad higher noise floor(white hash basically). However the same USB stick played via Yamaha, the sound turned even more musical, more danceable, and those MP3 files gained an analog like texture which to my ears are more sympathetic to the low res files. I also managed to stream music to the Yamaha from my smart phone and got very good results as well, with no signal drop of or anything as such.

I find it highly satisfying being able to enjoy music from an entry level system, costing even less than most of those high end cables that audiophiles prized. With the latest crop of budget hifi products on offer as represented here, I see a glimmer of hope for an industry coping with changes of modern life style. Lovely indeed! And lastly, after setting up this system in my buddies house, he sent me a thank you note, saying he was very satisfied with the sound of the system and will be so until he hit the jackpot, then he will consider an upgrade! 

For this project, I did all my shopping at Style Laser in Kuala Lumpur, a cash & carry outlet.